Replacement Reasons Management Documentation
This document provides a comprehensive guide for managing Order Replacement Reasons in the Exigo Admin portal.
Table of Contents
- Overview
- Accessing Replacement Reasons
- Viewing Replacement Reasons
- Adding a New Replacement Reason
- Editing a Replacement Reason
- Deleting a Replacement Reason
- Additional Actions
Overview
Replacement Reasons are used throughout the Exigo system to track why items are being replaced in orders. These reasons help maintain proper records for inventory management, customer service tracking, and reporting purposes.
Accessing Replacement Reasons
Navigation Path
- Log in to the Exigo Admin portal at
login.exigo.com - From the main menu, navigate to Administration > Settings
- Scroll down to the Replacement Reasons section
- Click on MODIFY REPLACEMENT REASONS
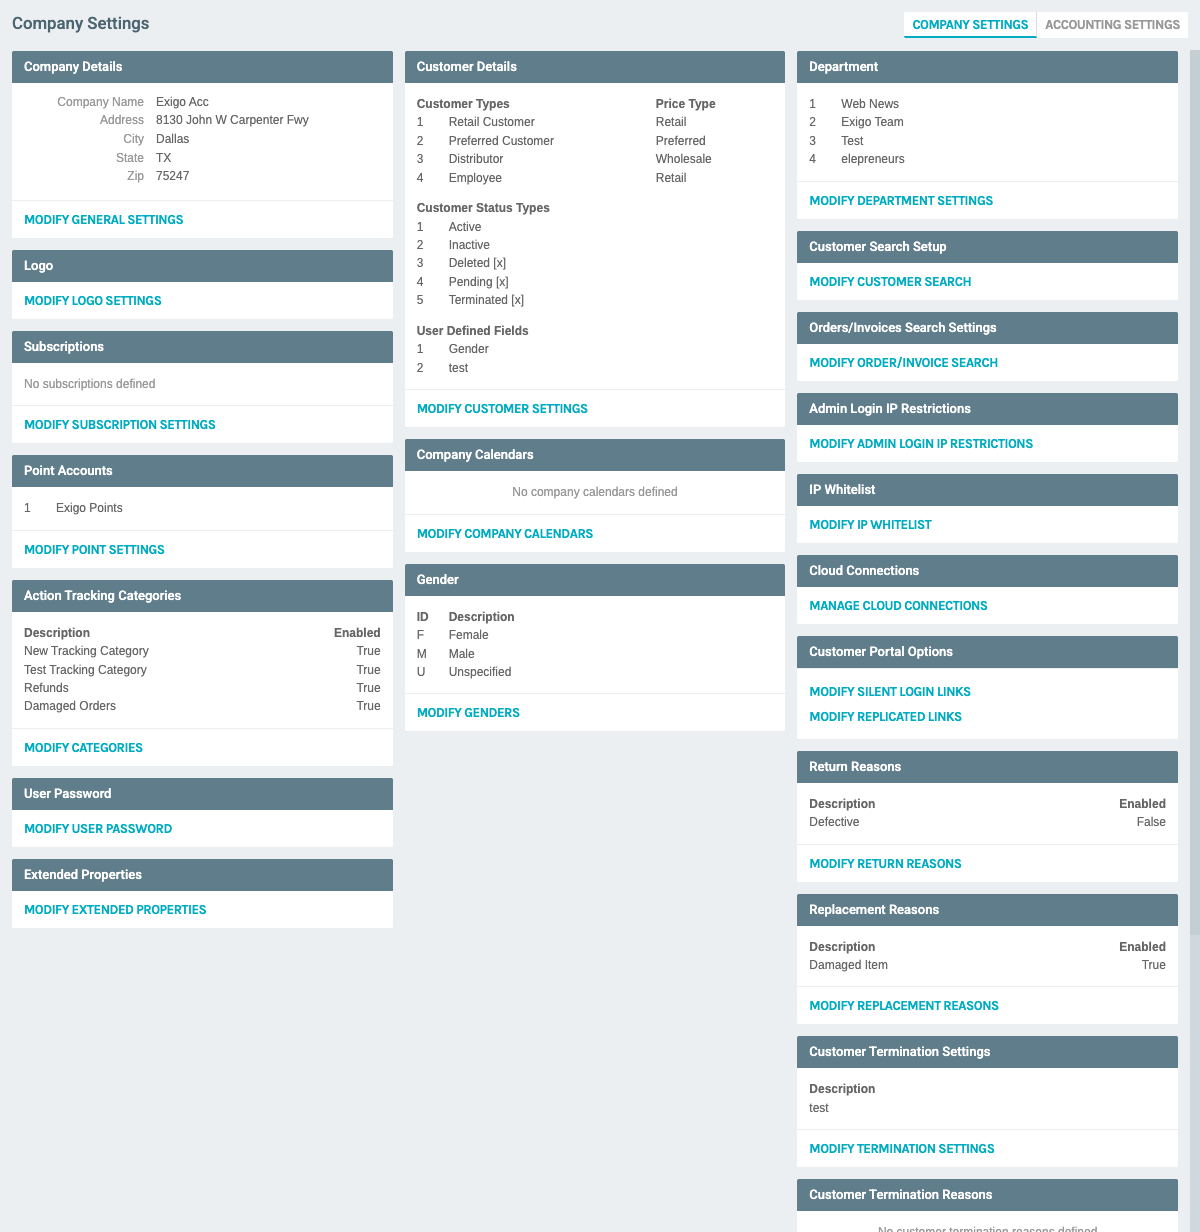
The Settings page displays a summary of existing replacement reasons, showing: - Description: The name/description of the replacement reason - Enabled: Whether the reason is currently active (True/False)
Viewing Replacement Reasons
Once you click "MODIFY REPLACEMENT REASONS", a modal window opens displaying the Replacement Reasons management interface.
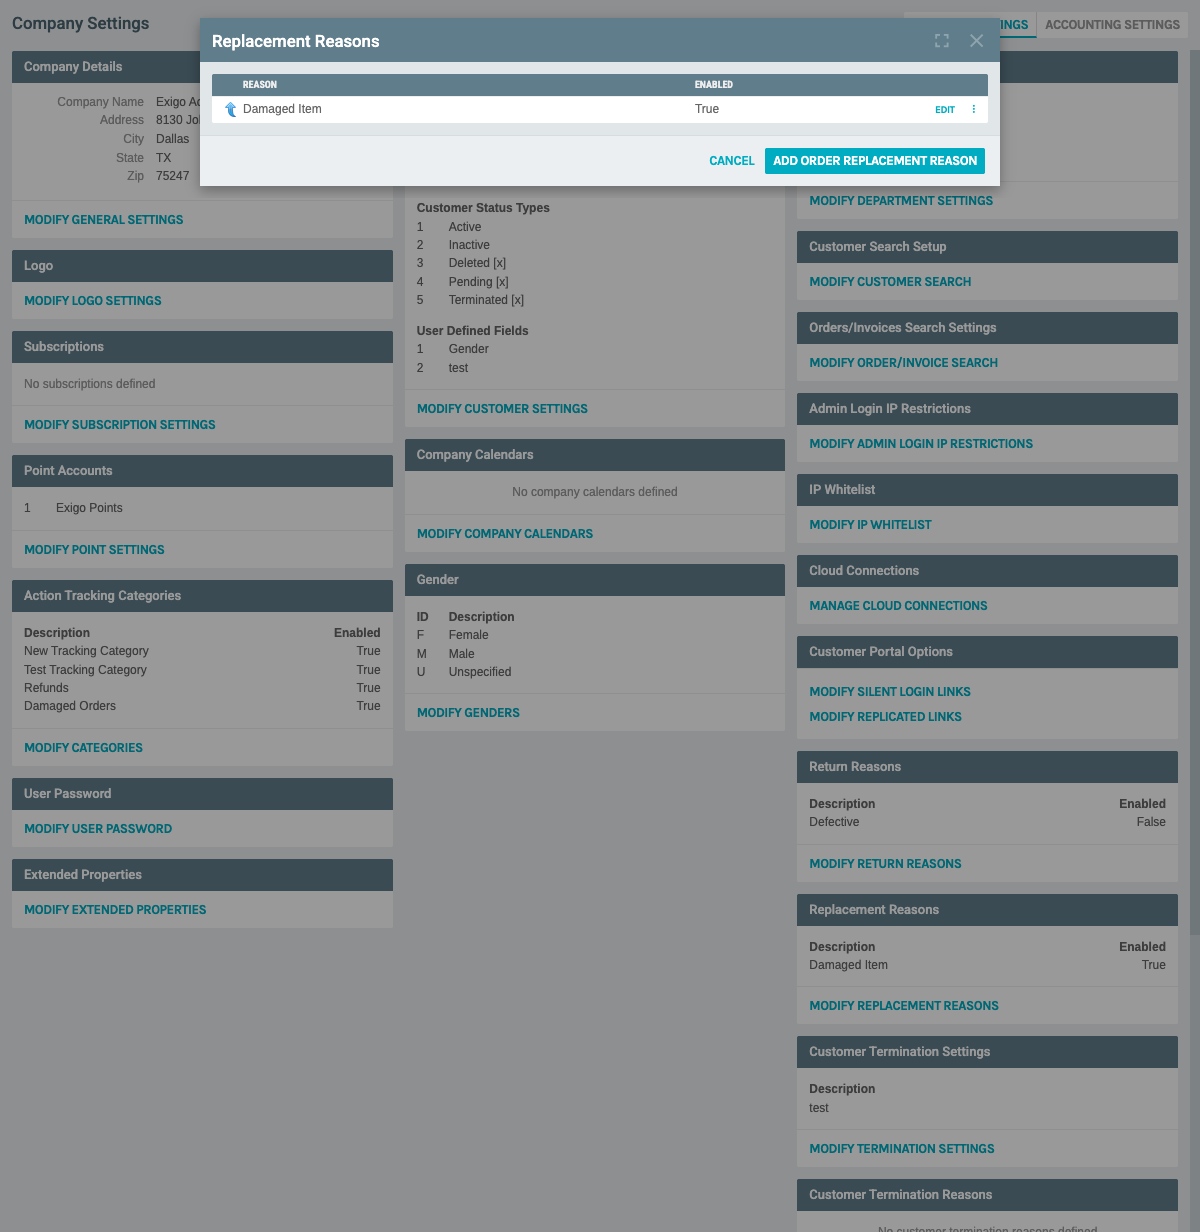
The management page includes: - Heading: "Replacement Reasons" - Add Button: "ADD ORDER REPLACEMENT REASON" to create new reasons - Table Columns: - REASON: The description of the replacement reason - ENABLED: Shows if the reason is active (True/False) - Action Buttons: Each row has: - EDIT: Opens the edit form for that reason - ⋮ (Three dots menu): Opens additional actions
Adding a New Replacement Reason
Steps to Add:
- Click the "ADD ORDER REPLACEMENT REASON" button at the top of the Replacement Reasons list
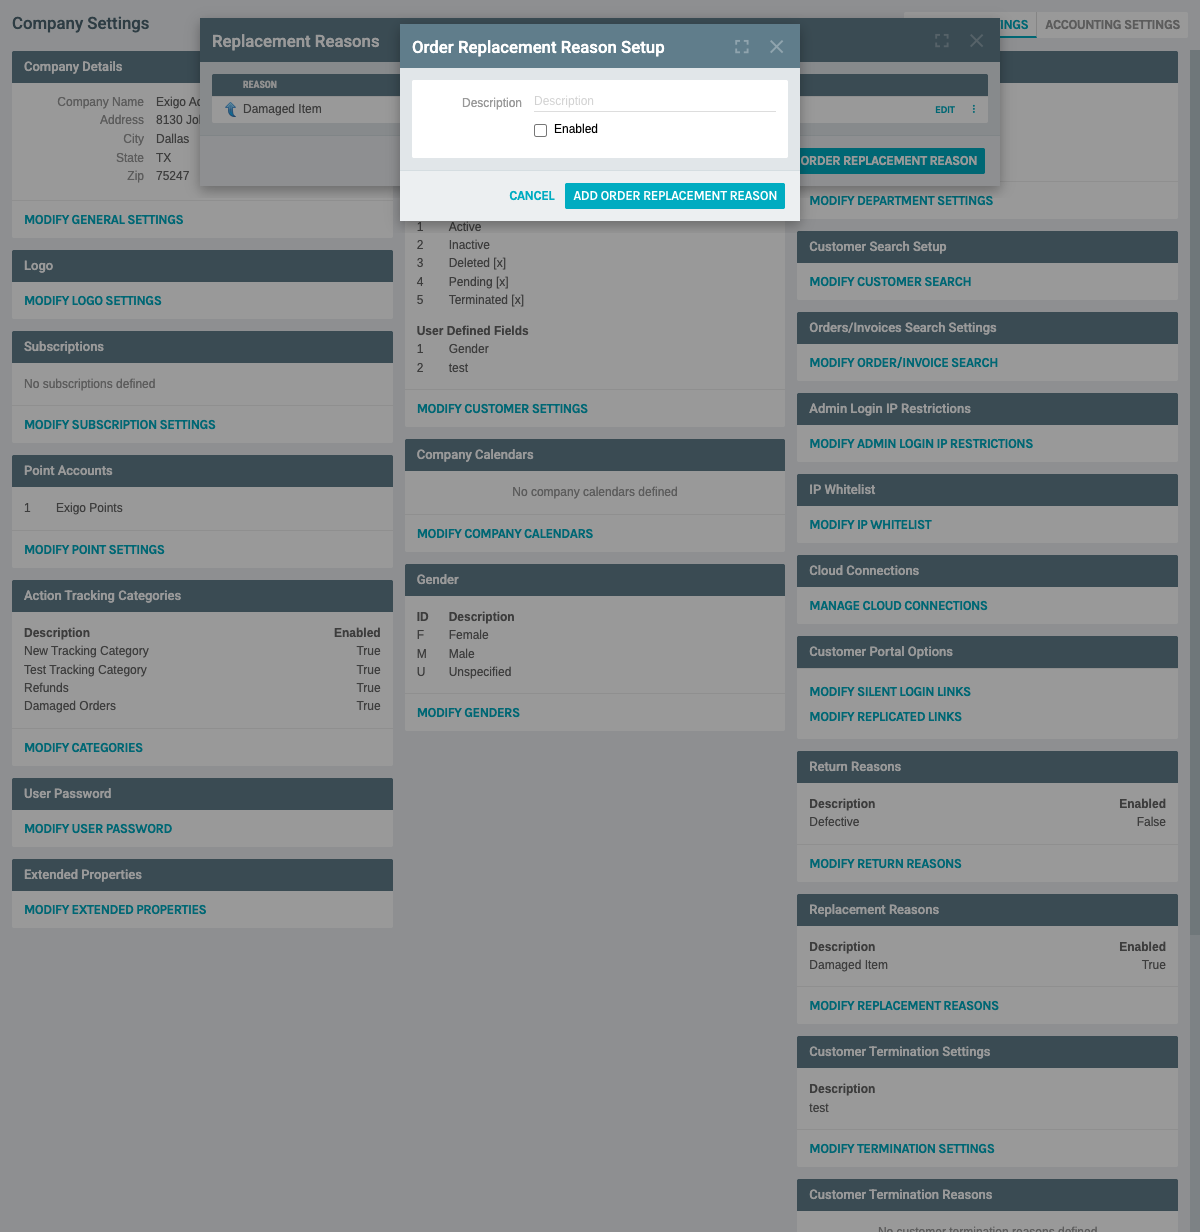
- The "Order Replacement Reason Setup" form appears with the following fields:
- Description (Required): Enter the name/description of the replacement reason
-
Enabled (Checkbox): Check to make the reason active immediately
-
Fill in the form:
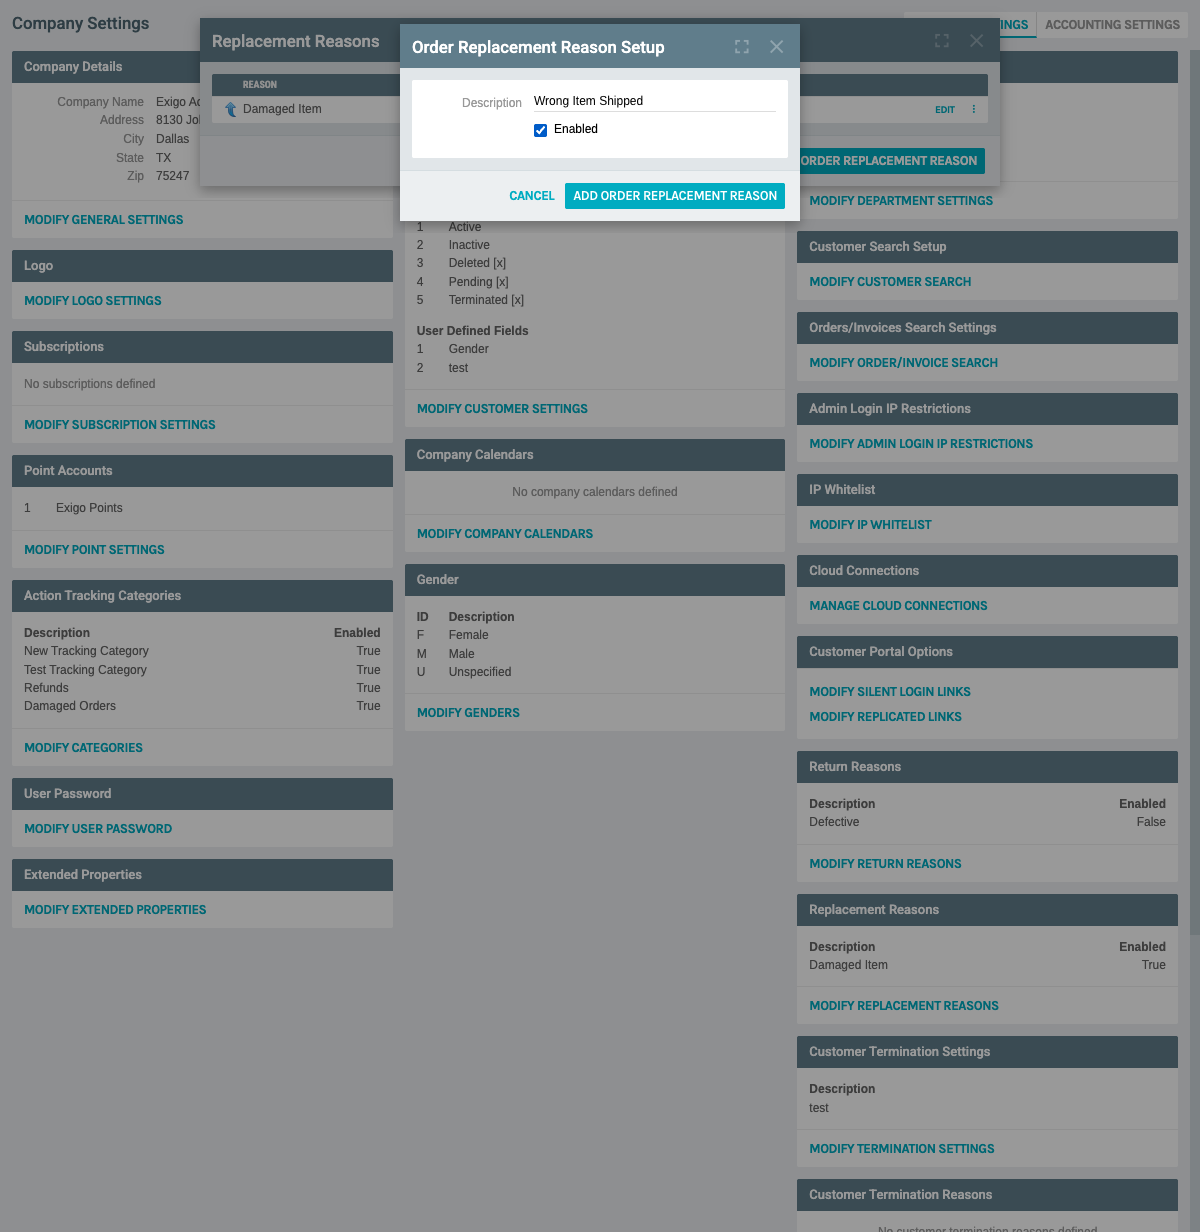
Example: - Description: "Wrong Item Shipped" - Enabled: ✓ (checked)
-
Click "ADD ORDER REPLACEMENT REASON" to save
-
The new reason appears in the list:
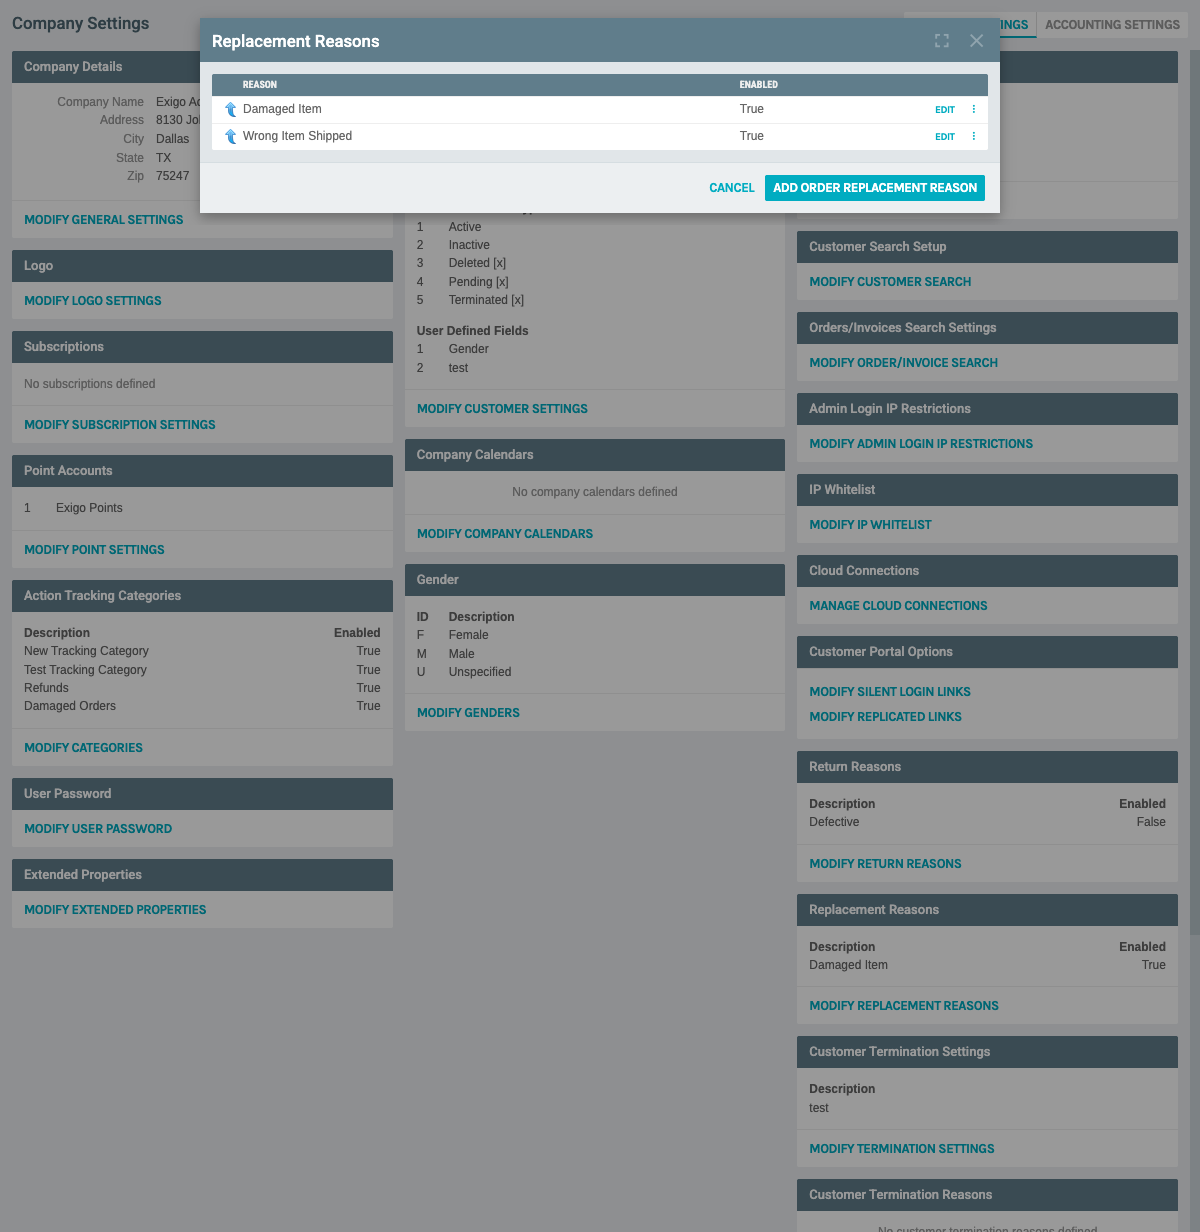
The list now shows both replacement reasons: - Damaged Item (Enabled: True) - Wrong Item Shipped (Enabled: True)
Editing a Replacement Reason
Steps to Edit:
- From the Replacement Reasons list, click the "EDIT" button next to the reason you want to modify
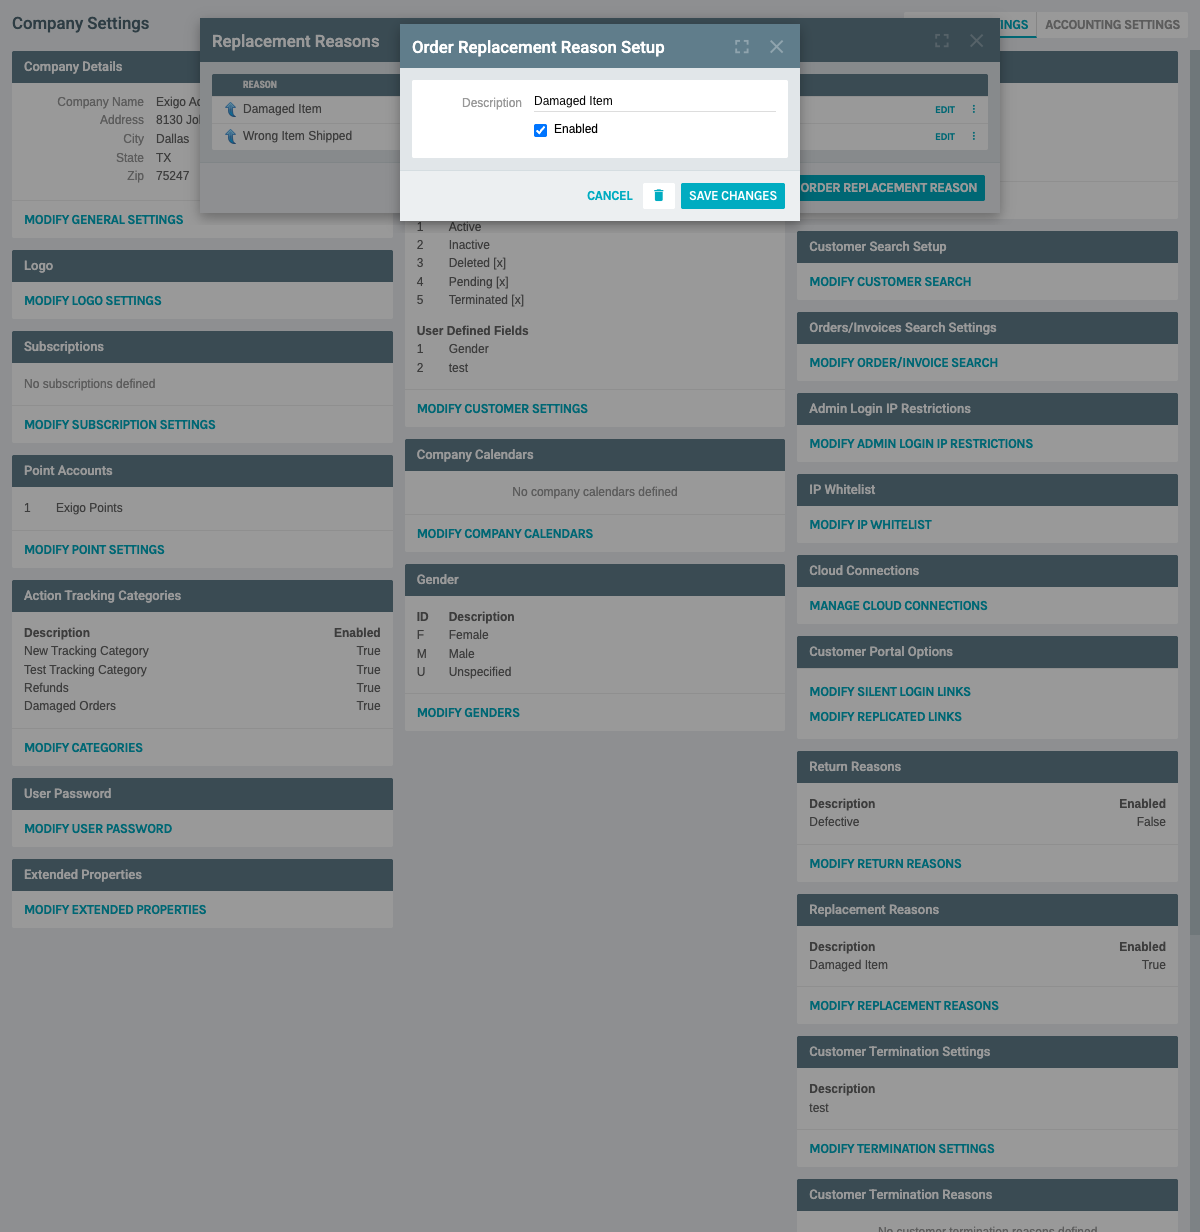
- The "Order Replacement Reason Setup" form appears with:
- Description field: Pre-filled with the current description
- Enabled checkbox: Shows current enabled status
- SAVE CHANGES button: Saves modifications
- Delete icon (🗑️): Allows deletion of the reason
-
CANCEL button: Closes without saving
-
Make your desired changes to the Description or Enabled status
-
Click "SAVE CHANGES" to apply the modifications
Deleting a Replacement Reason
Steps to Delete:
-
Click the "EDIT" button for the replacement reason you want to delete
-
In the edit form, click the delete icon (🗑️) at the top of the form
-
A confirmation dialog appears:
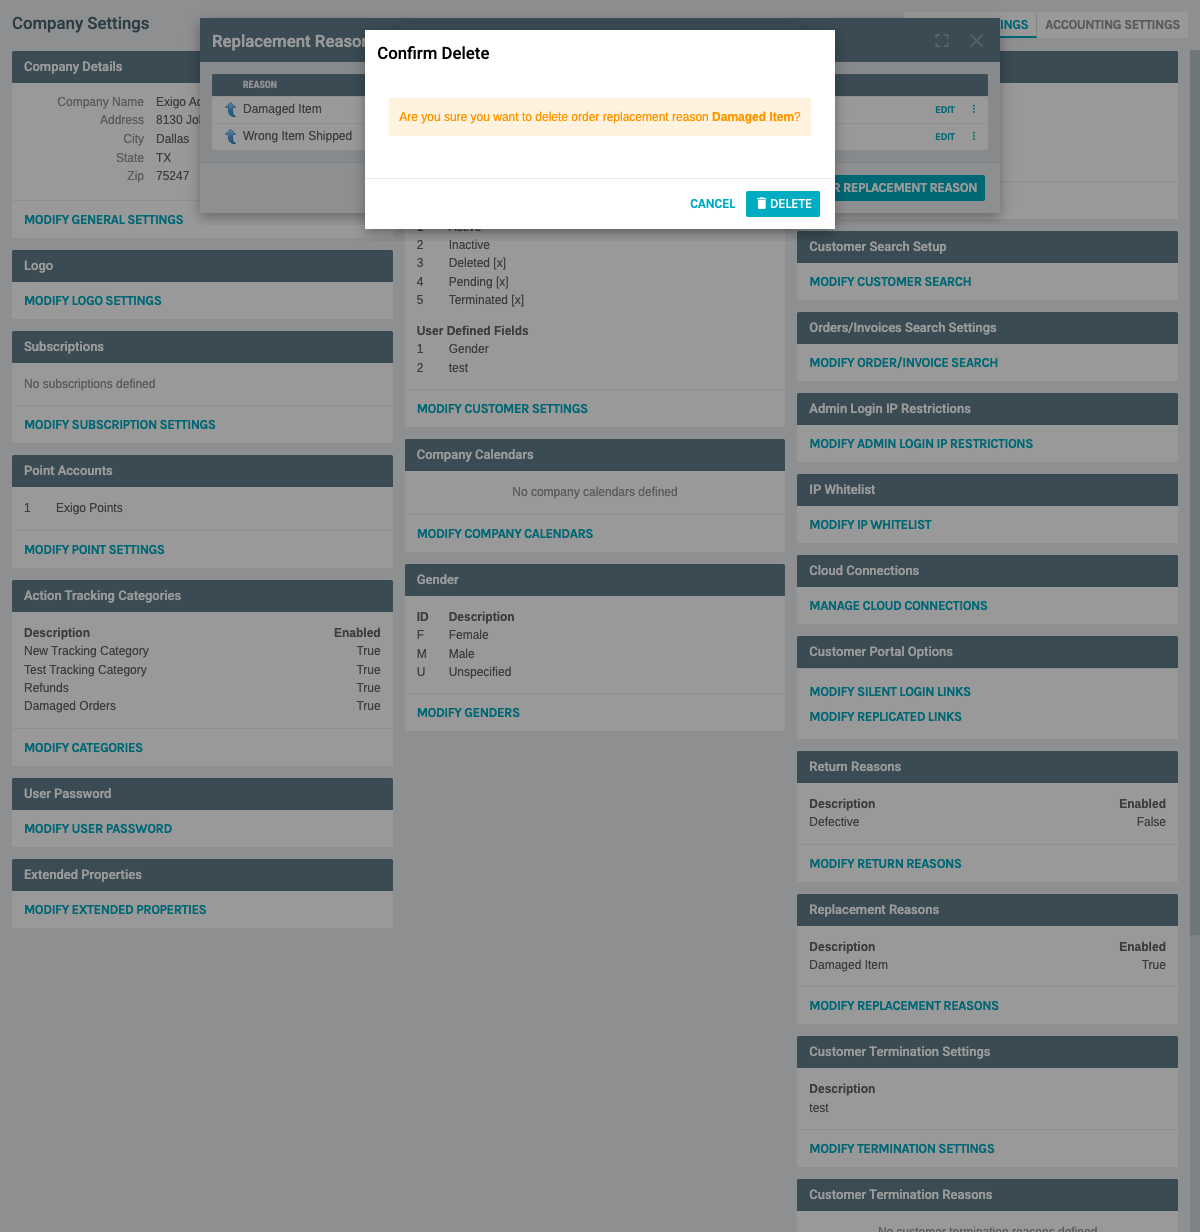
The dialog displays: - Heading: "Confirm Delete" - Message: "Are you sure you want to delete order replacement reason [Reason Name]?" - DELETE button: Confirms the deletion - CANCEL button: Cancels the deletion
- Click "DELETE" to permanently remove the replacement reason, or "CANCEL" to abort
⚠️ Warning: Deleting a replacement reason is permanent. Ensure that the reason is not being used in any existing orders or system configurations before deleting.
Additional Actions
Three Dots Menu
Each replacement reason has a three dots menu (⋮) that provides quick access to common actions:
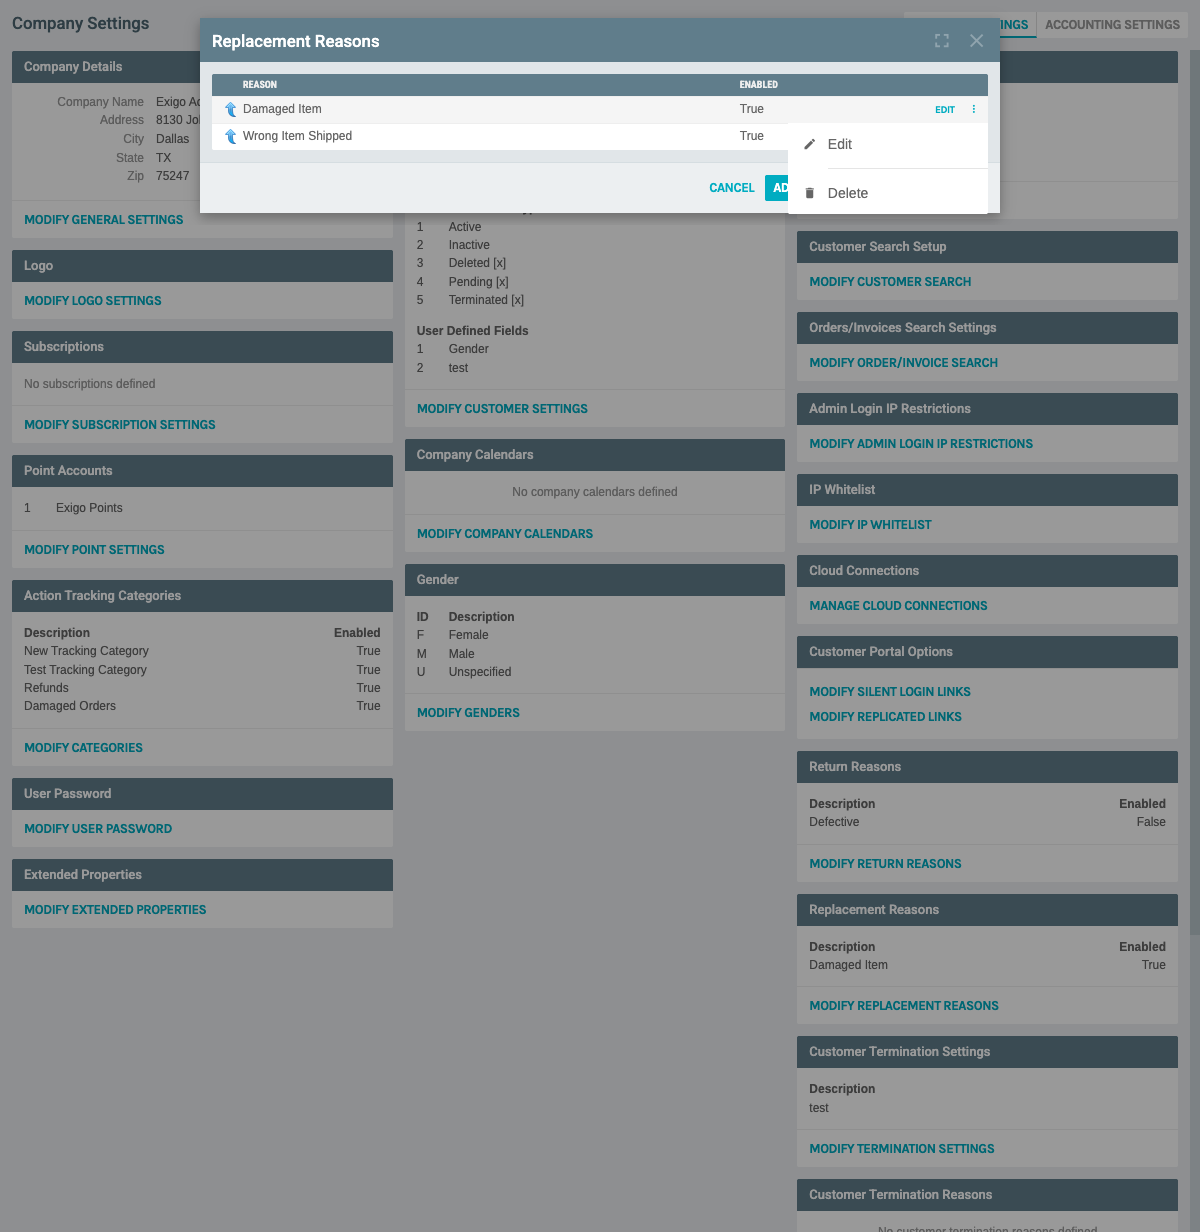
The menu includes: - Edit: Opens the edit form for the replacement reason (same as clicking the EDIT button) - Delete: Opens the delete confirmation dialog directly
This menu provides a convenient alternative to the main action buttons, especially when working with multiple replacement reasons.
Best Practices
- Use Clear Descriptions: Make replacement reason descriptions clear and specific so users can easily select the appropriate reason
- Enable/Disable Instead of Delete: Consider disabling a replacement reason (unchecking "Enabled") rather than deleting it, especially if it has been used in historical orders
- Consistent Naming: Use a consistent naming convention for replacement reasons to maintain organization
- Regular Review: Periodically review replacement reasons to ensure they are still relevant and being used appropriately
System Notes
- Replacement reasons with "Enabled" set to False will not appear in dropdown lists when processing orders
- Historical orders will retain references to replacement reasons even if they are later deleted or disabled
- The system displays replacement reasons in the order they are listed in the management interface
Documentation created: February 11, 2026 Environment: Exigo Admin v2025.5.7.8