Creating Custom Fields (Admin)
This guide explains how to create and manage Custom Fields in Exigo Admin. Custom fields allow you to extend the default data model by adding company-specific fields to customer records and item records.
Overview
Exigo supports two types of custom fields:
- Customer Custom Fields -- User-defined fields attached to customer records (e.g., "Gender", "T-shirt Size", "Preferred Language"). Managed under Company Settings > Modify Customer Settings > Custom Fields.
- Item Custom Fields -- Pre-defined field slots on item records (e.g., Short Descriptions, Long Descriptions, Fields 1-10, Other Checks, Autos). Managed under Company Settings > Modify Item Fields.
Step-by-step: Customer Custom Fields
1) Navigate to Settings
- In the left navigation sidebar, expand Administration
- Click Settings
- The Company Settings page will load

2) Locate the Customer Details Section
Scroll down on the Company Settings page to find the Customer Details section. Under it you will see:
- Customer Types -- the list of customer types and their associated price types
- Customer Status Types -- the available status values for customers
- User Defined Fields -- the list of existing customer custom fields with their ID and name
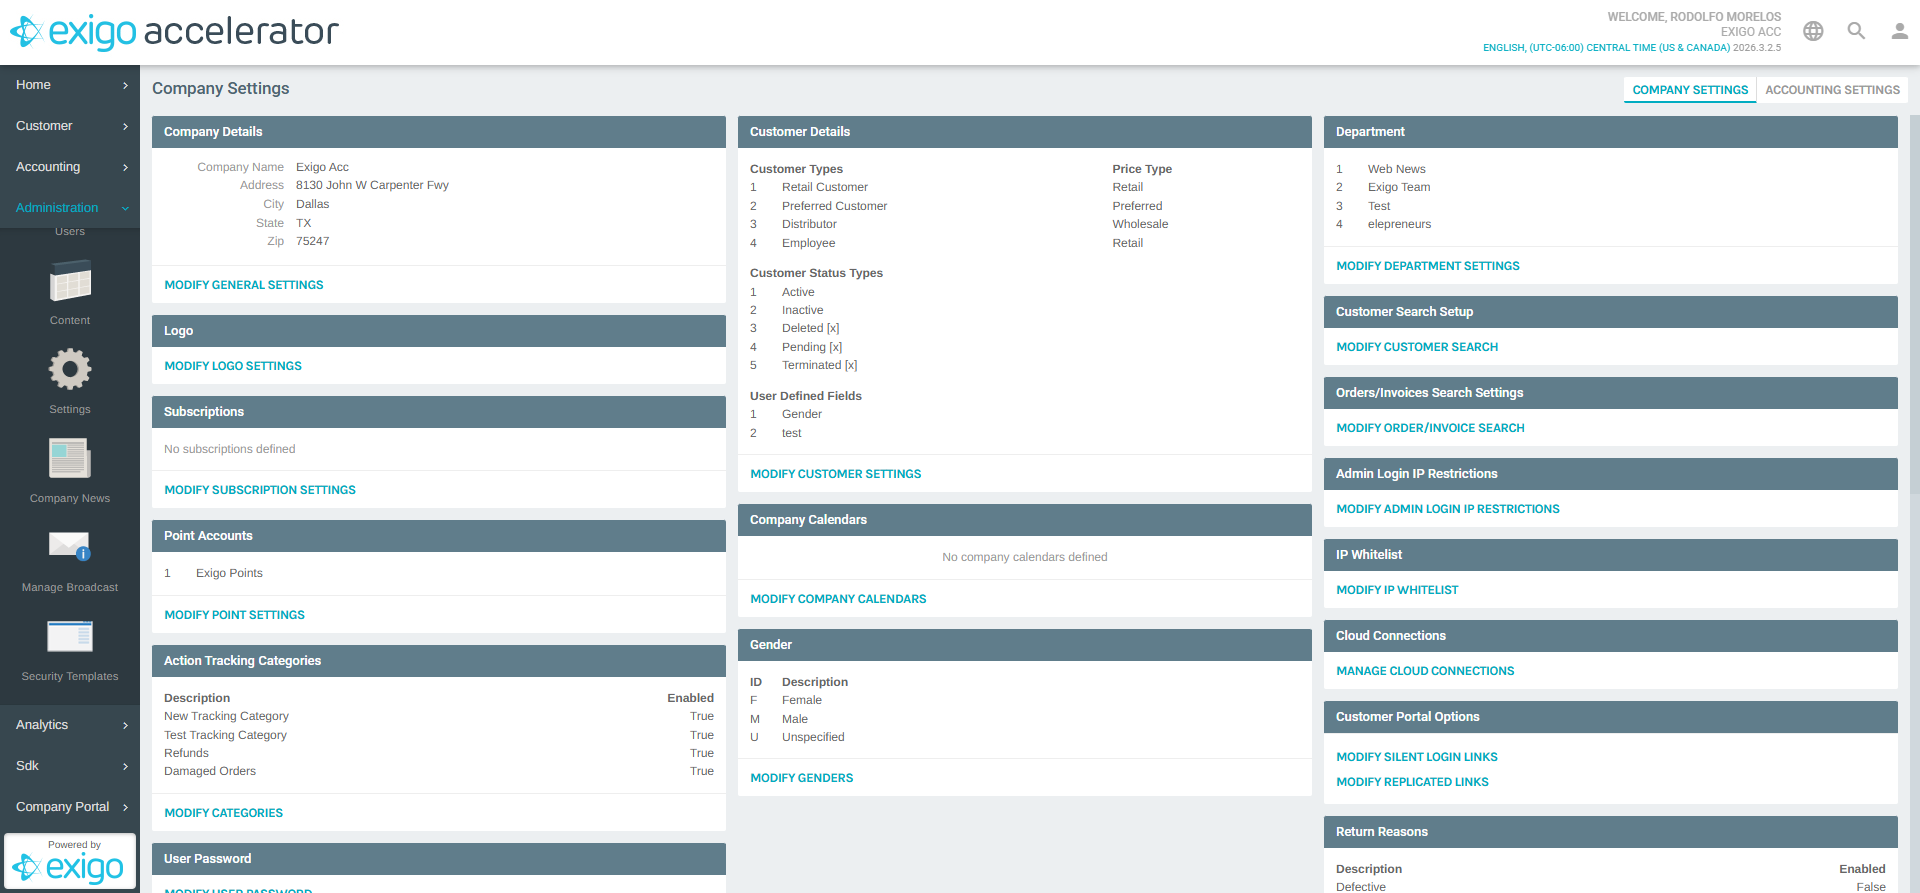
Click MODIFY CUSTOMER SETTINGS to open the Customer Settings popup.
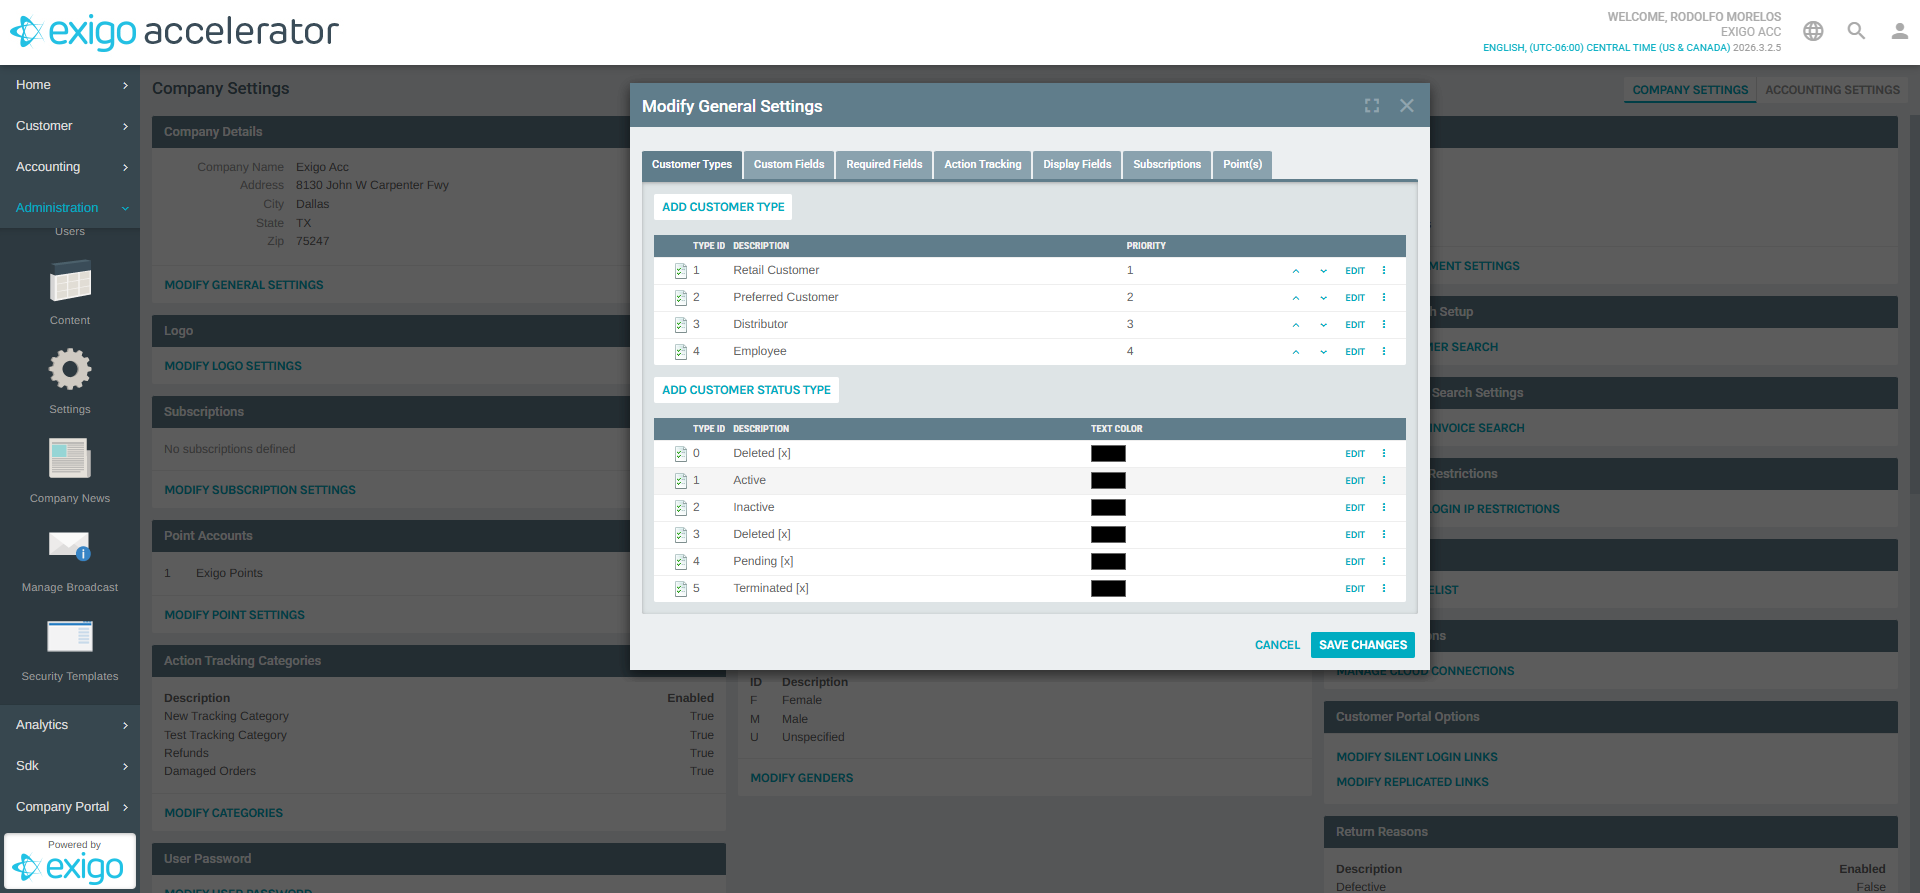
3) Open the Customer Settings Popup
The popup opens on the Customer Types tab by default. It contains several tabs:
- Customer Types
- Custom Fields (this is where you manage custom fields)
- Required Fields
- Action Tracking
- Display Fields
- Subscriptions
- Point(s)
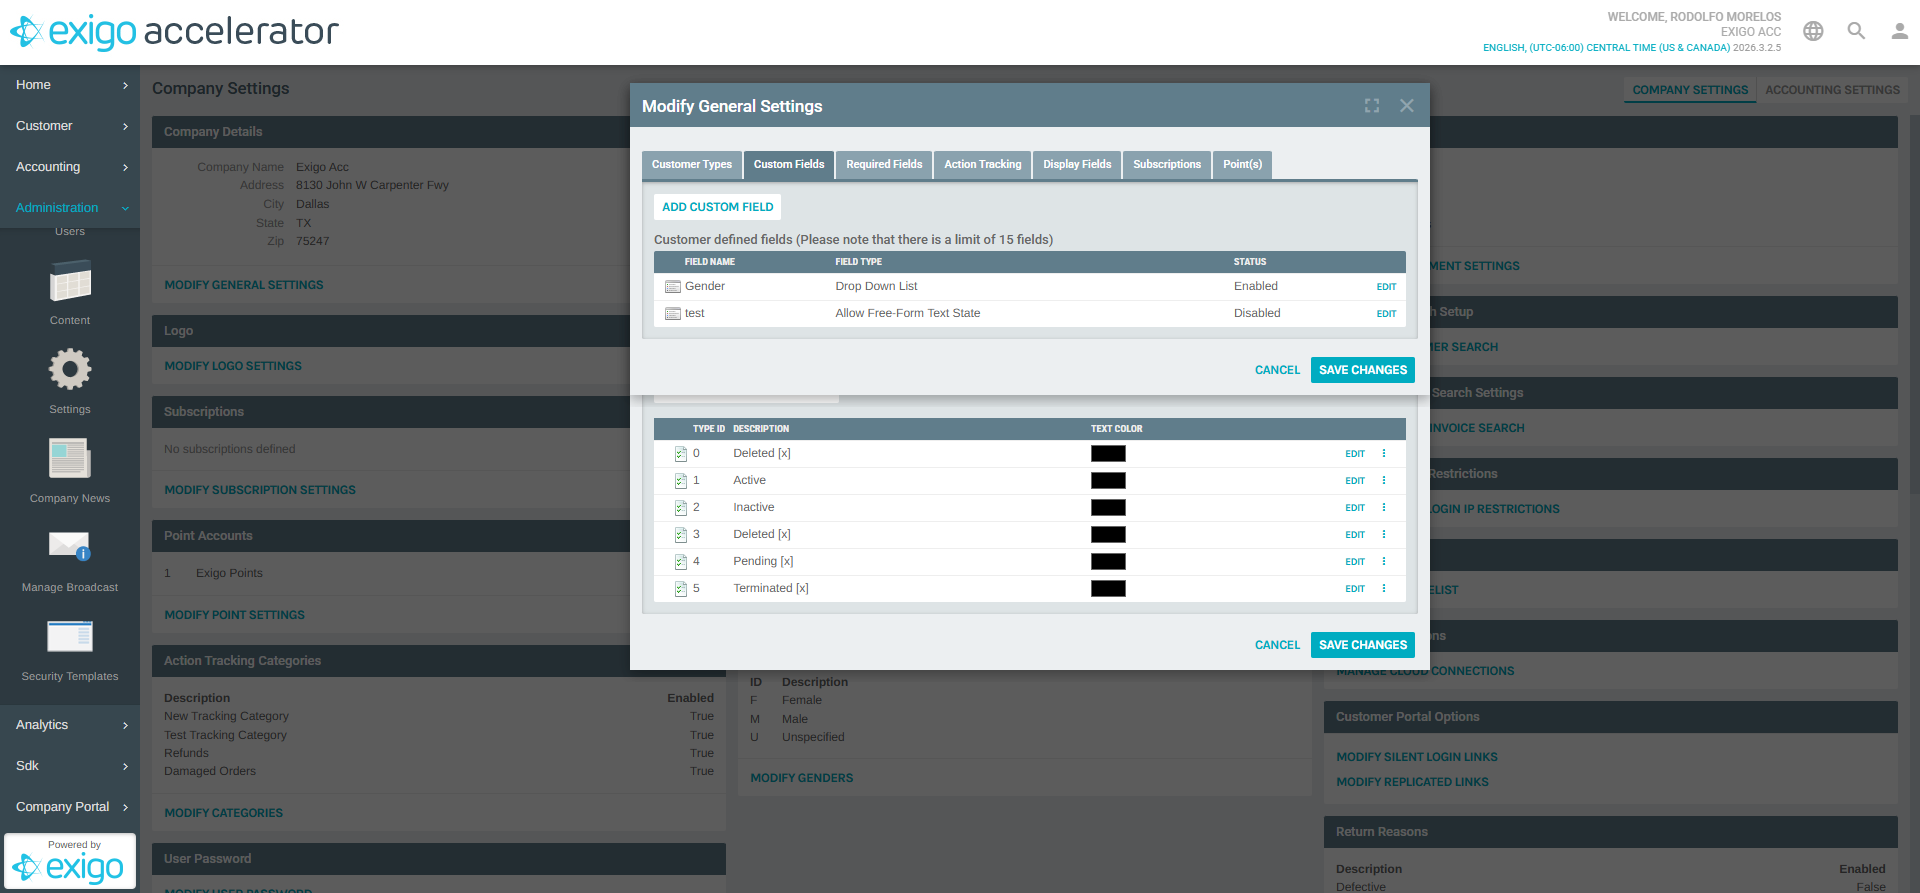
4) Navigate to the Custom Fields Tab
Click the Custom Fields tab in the popup. This displays:
- ADD CUSTOM FIELD button at the top
- A heading: "Customer defined fields (Please note that there is a limit of 15 fields)"
- A table listing existing custom fields with columns: Field Name, Field Type, Status
- An EDIT link on each row to modify an existing field
5) Add a New Custom Field
Click ADD CUSTOM FIELD to open the Property Field Setup form.
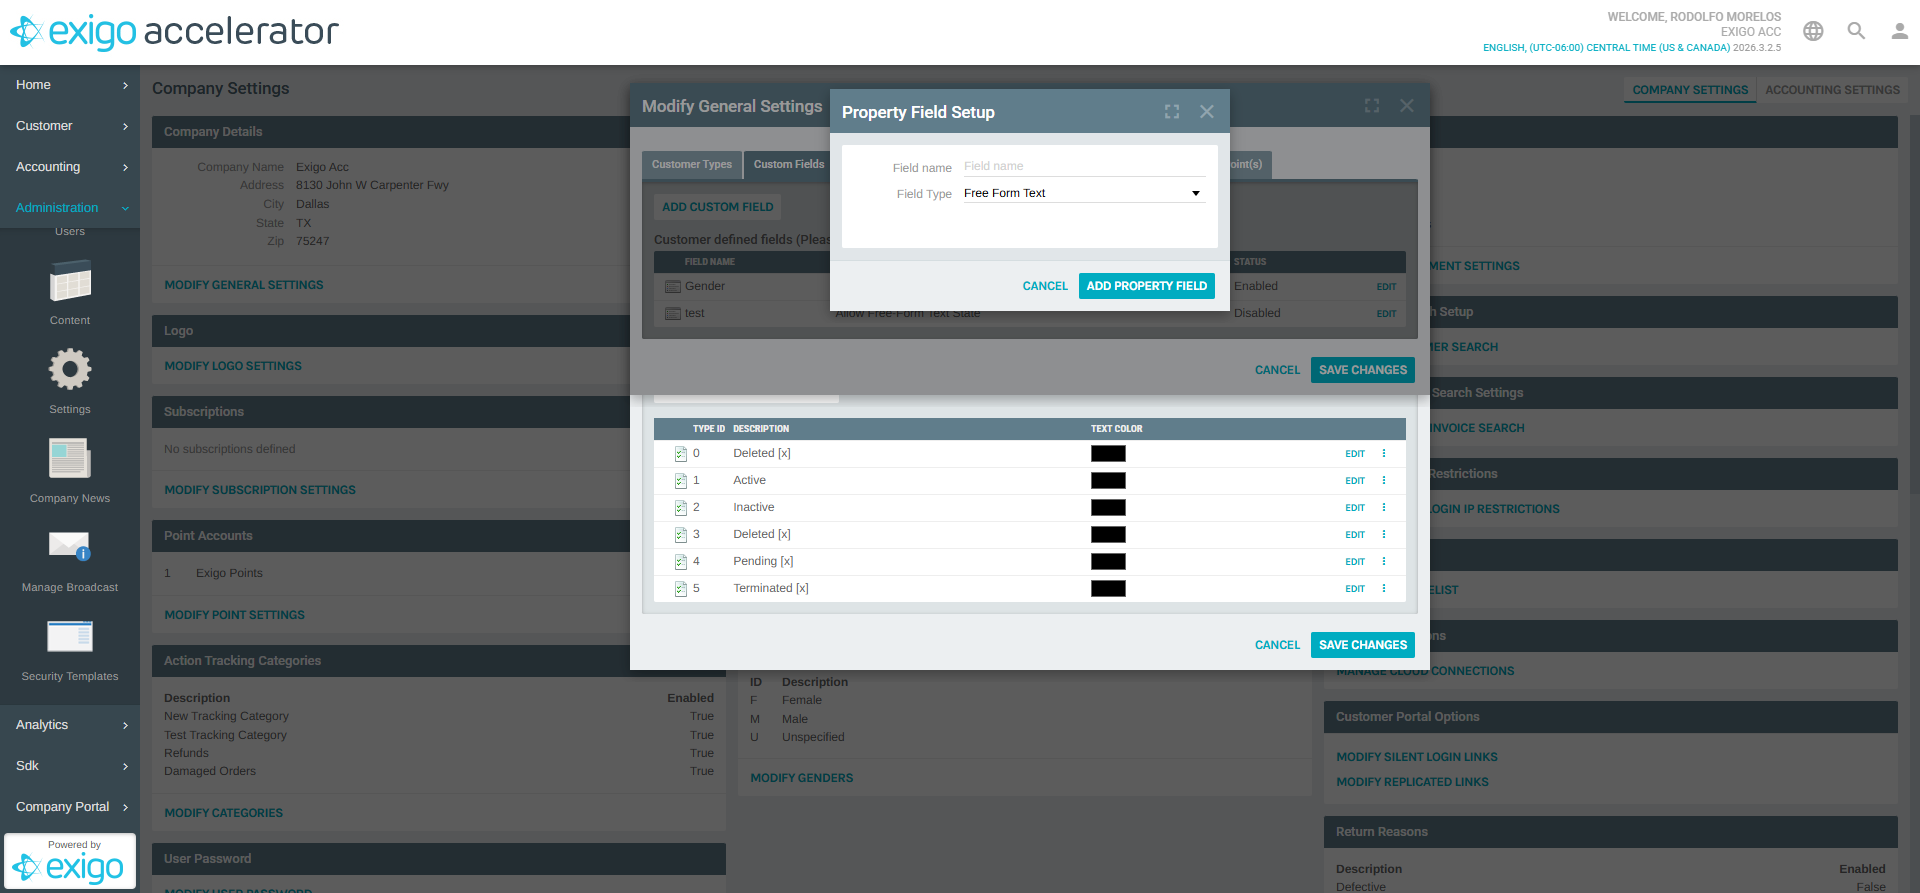
Fill in the following:
| Field | Description |
|---|---|
| Field name | A descriptive name for the field (required) |
| Field Type | Select the data type for the field from the dropdown |
Available Field Types
Click the Field Type dropdown to see the available options:
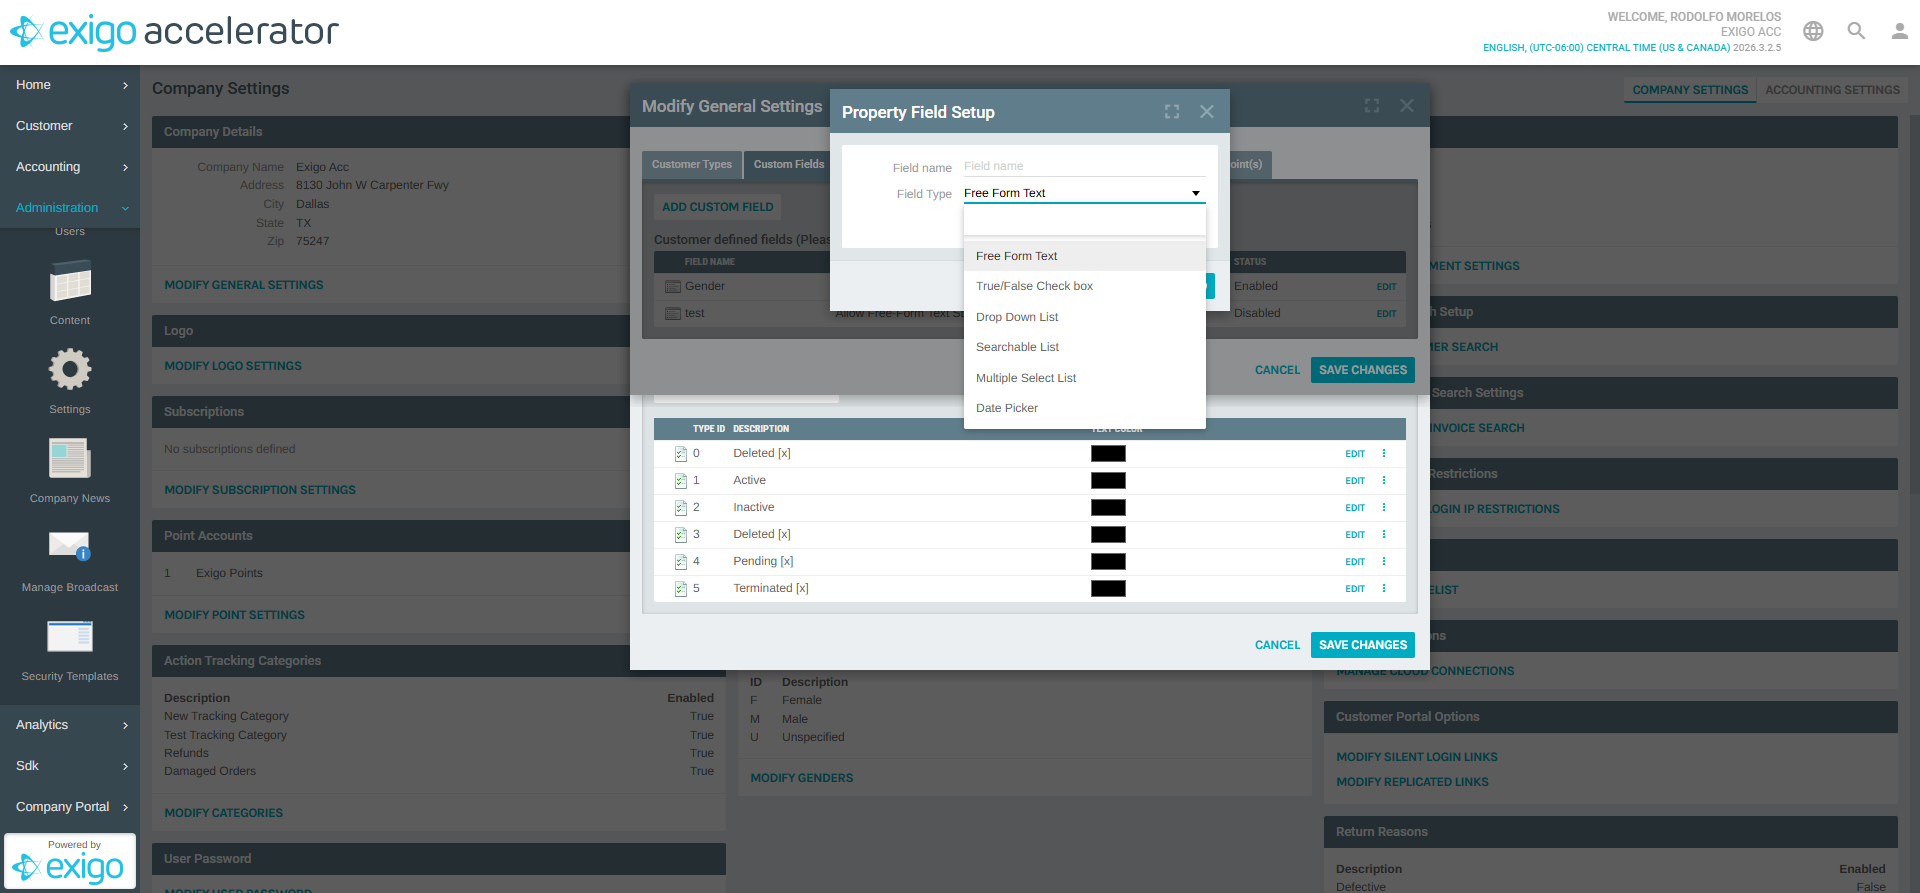
| Field Type | Description |
|---|---|
| Free Form Text | A plain text input field for any value |
| True/False Check box | A boolean checkbox (checked or unchecked) |
| Drop Down List | A predefined list of options the user selects from |
| Searchable List | A dropdown with search/filter functionality for large option sets |
| Multiple Select List | Allows selecting more than one option from a list |
| Date Picker | A date selection control |
After filling in the field name and selecting the type, click ADD PROPERTY FIELD to create the field, or CANCEL to discard.
6) Edit or Disable an Existing Custom Field
From the Custom Fields tab, click EDIT next to any existing field to modify its name, type, or status. You can set the status to Disabled to hide the field without deleting it.
7) Save Changes
After adding or editing custom fields, click SAVE CHANGES at the top of the Customer Settings popup to persist your changes.
Step-by-step: Item Custom Fields
1) Locate the Item Custom Field Settings Section
On the Company Settings page, scroll down to find the Item Custom Field Settings section.
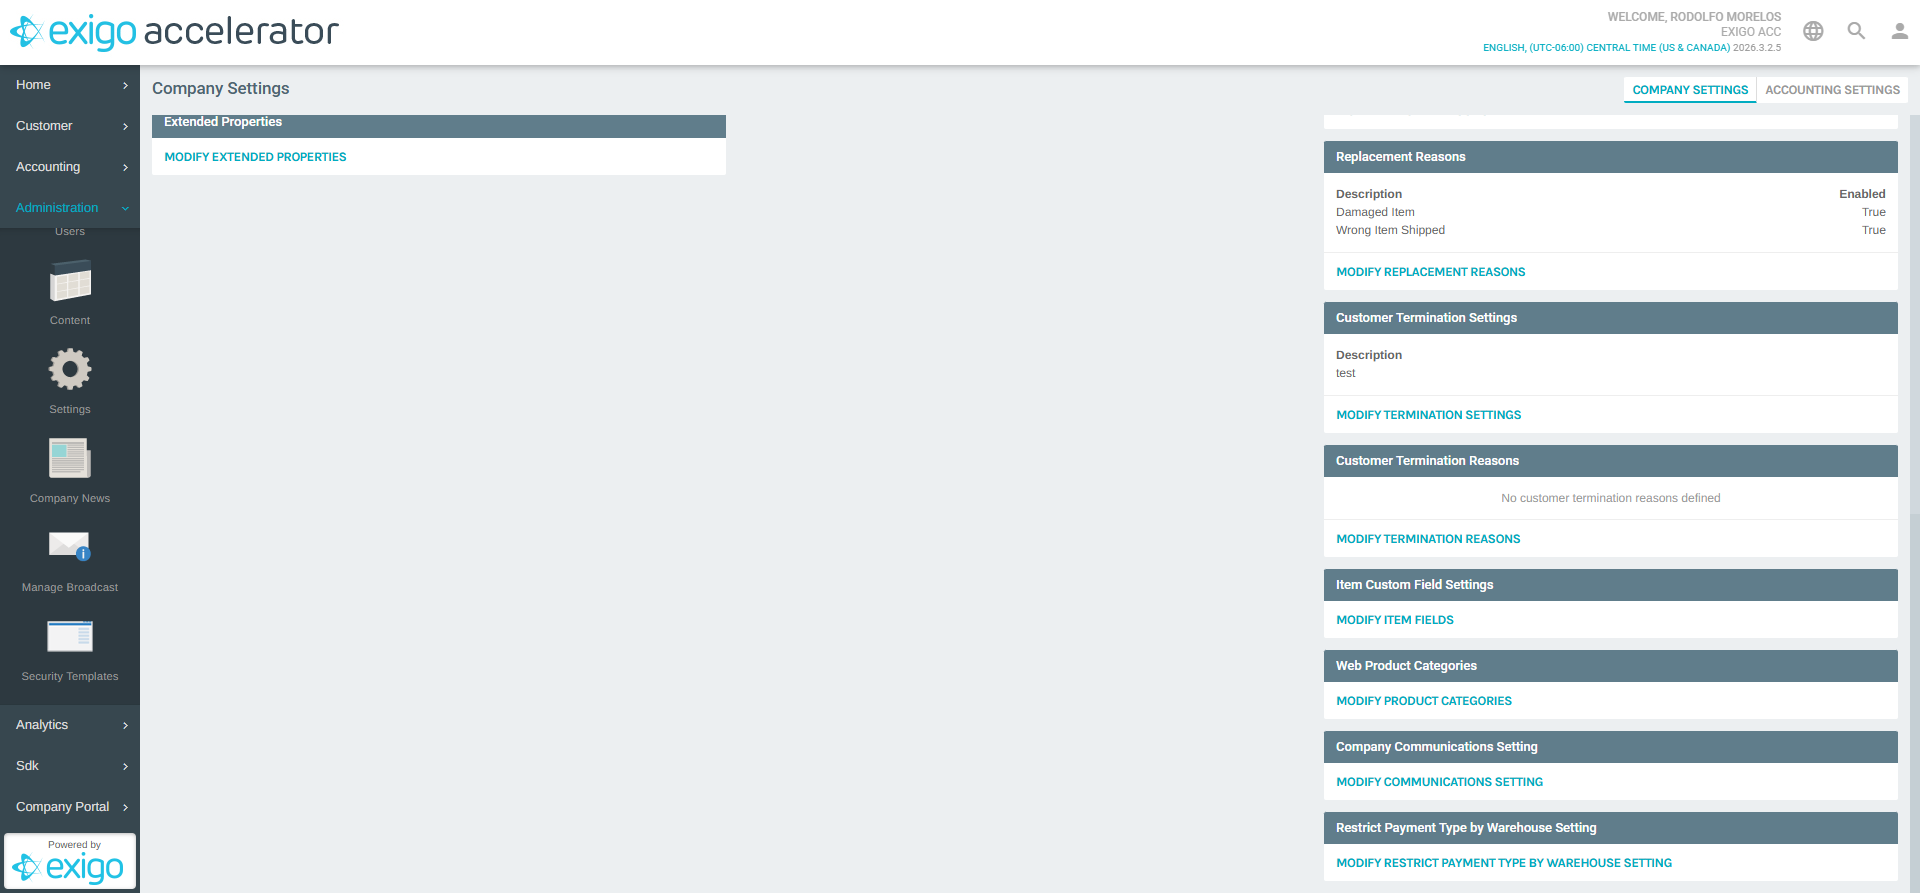
Click MODIFY ITEM FIELDS to open the Item Field Names popup.
2) Configure Item Field Names
The Item Field Names popup displays all available item-level custom fields. Unlike customer custom fields, these are pre-defined field slots that you enable and rename.
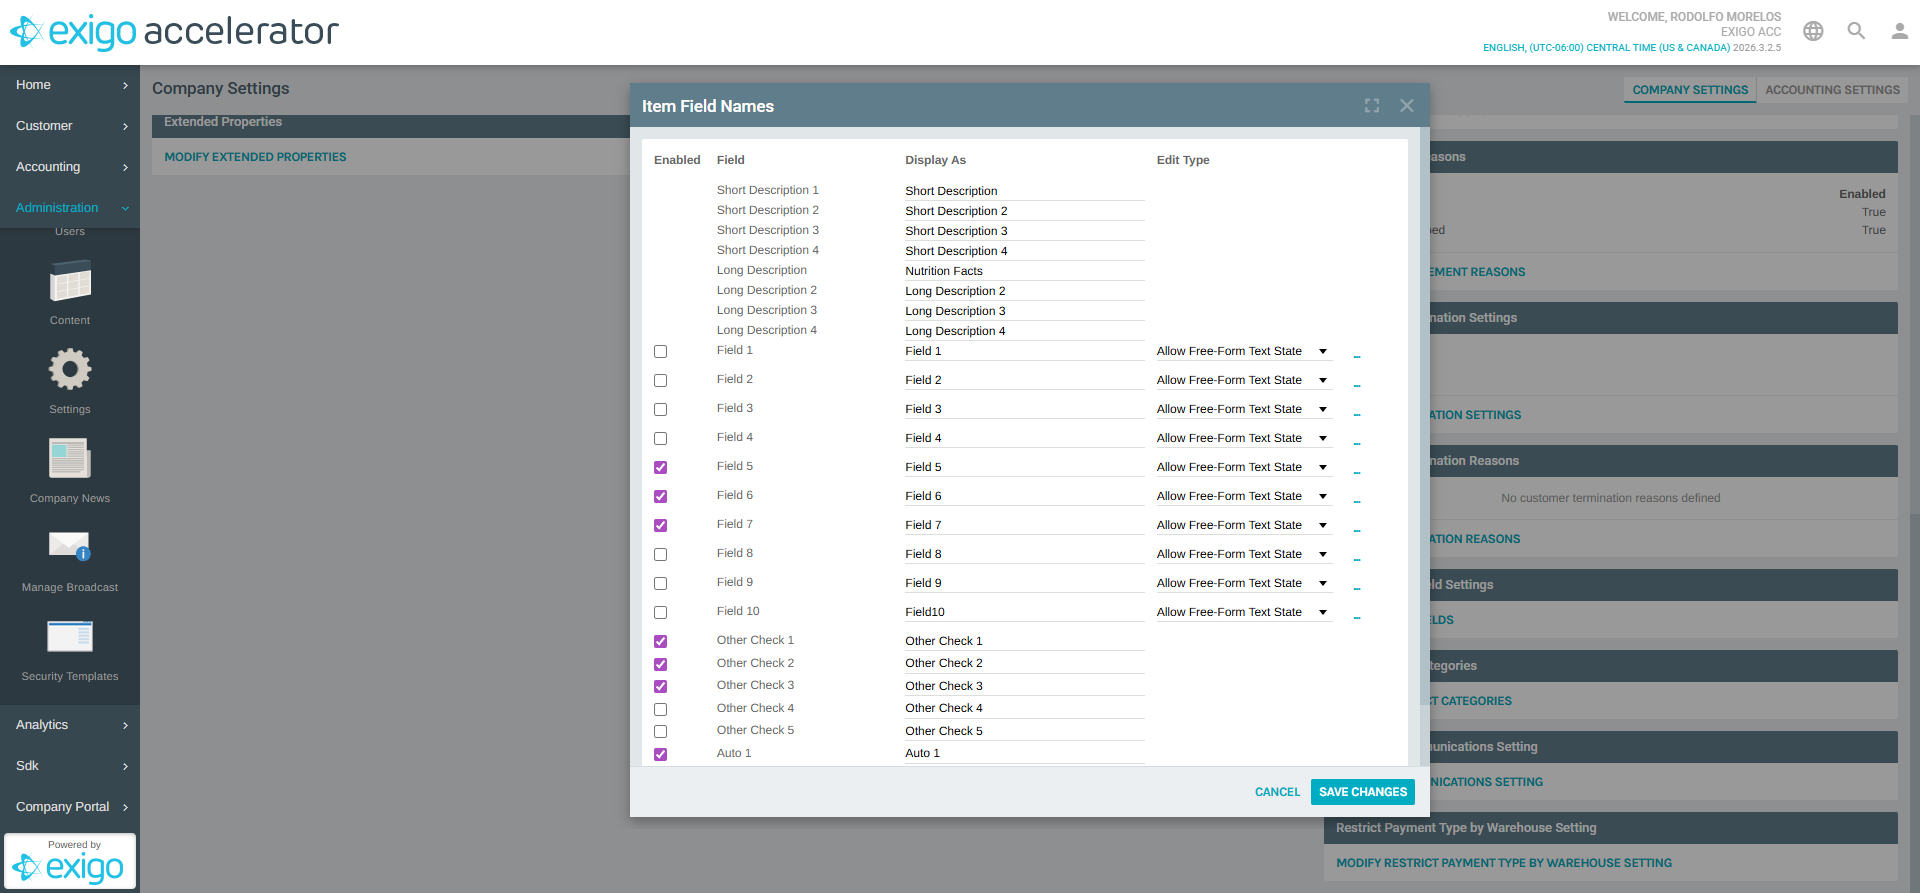
Each field row has:
| Column | Description |
|---|---|
| Enabled | Checkbox to enable/disable the field |
| Field | The system field identifier (e.g., "Field 1", "Short Description 1") |
| Display As | A text input to set the label shown in the Admin UI |
| Edit Type | The data entry type (e.g., "Allow Free-Form Text State") with a "..." button to configure options |
Available Field Slots
| Category | Fields | Description |
|---|---|---|
| Short Descriptions | Short Description 1-4 | Brief text fields always enabled |
| Long Descriptions | Long Description 1-4 | Extended text fields always enabled |
| Custom Fields | Field 1-10 | Configurable fields with selectable edit types |
| Other Checks | Other Check 1-5 | Boolean checkbox fields |
| Auto Fields | Auto 1-3 | Auto-populated or system-managed fields |
3) Save Changes
After enabling fields and customizing their display names, click SAVE CHANGES to persist the configuration.
Notes
- Customer custom fields have a maximum limit of 15 fields
- Item custom fields use pre-defined slots -- you cannot add new slots, only enable, rename, and configure the existing ones
- Custom field values are accessible through the Exigo API for integration with external systems
- When using the Drop Down List or Multiple Select List field types for customer custom fields, you will need to define the list options after creating the field
- Disabling a custom field hides it from the UI but does not delete existing data stored in that field