Money In Merchant Setup
This guide explains how to configure the Money In payment processing integration in the Exigo platform. The Money In module handles all inbound payment transactions, including credit cards, ACH transfers, and digital wallets. Configuration involves two areas: the SDK Money In app (under the SDK menu) and the Merchant settings within Accounting Settings.
Table of Contents
- Overview
- Accessing the Money In SDK
- Money In SDK Portal
- Tests
- Source Code
- Builds
- Configuring Merchants
- Accessing the Merchant Tab
- Merchant List
- Adding a New Merchant
- Editing an Existing Merchant
- Merchant Field Reference
- Merchant Types
- Process Types
- Payment Card Accounts (Pmt Card)
- Monitoring Transactions (Money In Log)
Overview
The Money In module is the Exigo SDK component responsible for processing inbound payments. It acts as a gateway bridge between your platform and third-party payment processors (e.g., Network Merchants, AuthorizeNet, PayPal).
Each merchant configuration defines:
- Which payment processor to use (Merchant Type)
- What kind of transaction is supported (Process Type: Credit Card, ACH, Wallet, WebWizard)
- Which warehouse the merchant is associated with
- What currency the merchant processes
Accessing the Money In SDK
The Money In SDK is located under the Sdk section of the left navigation panel.
Navigation path: Sdk > Money In
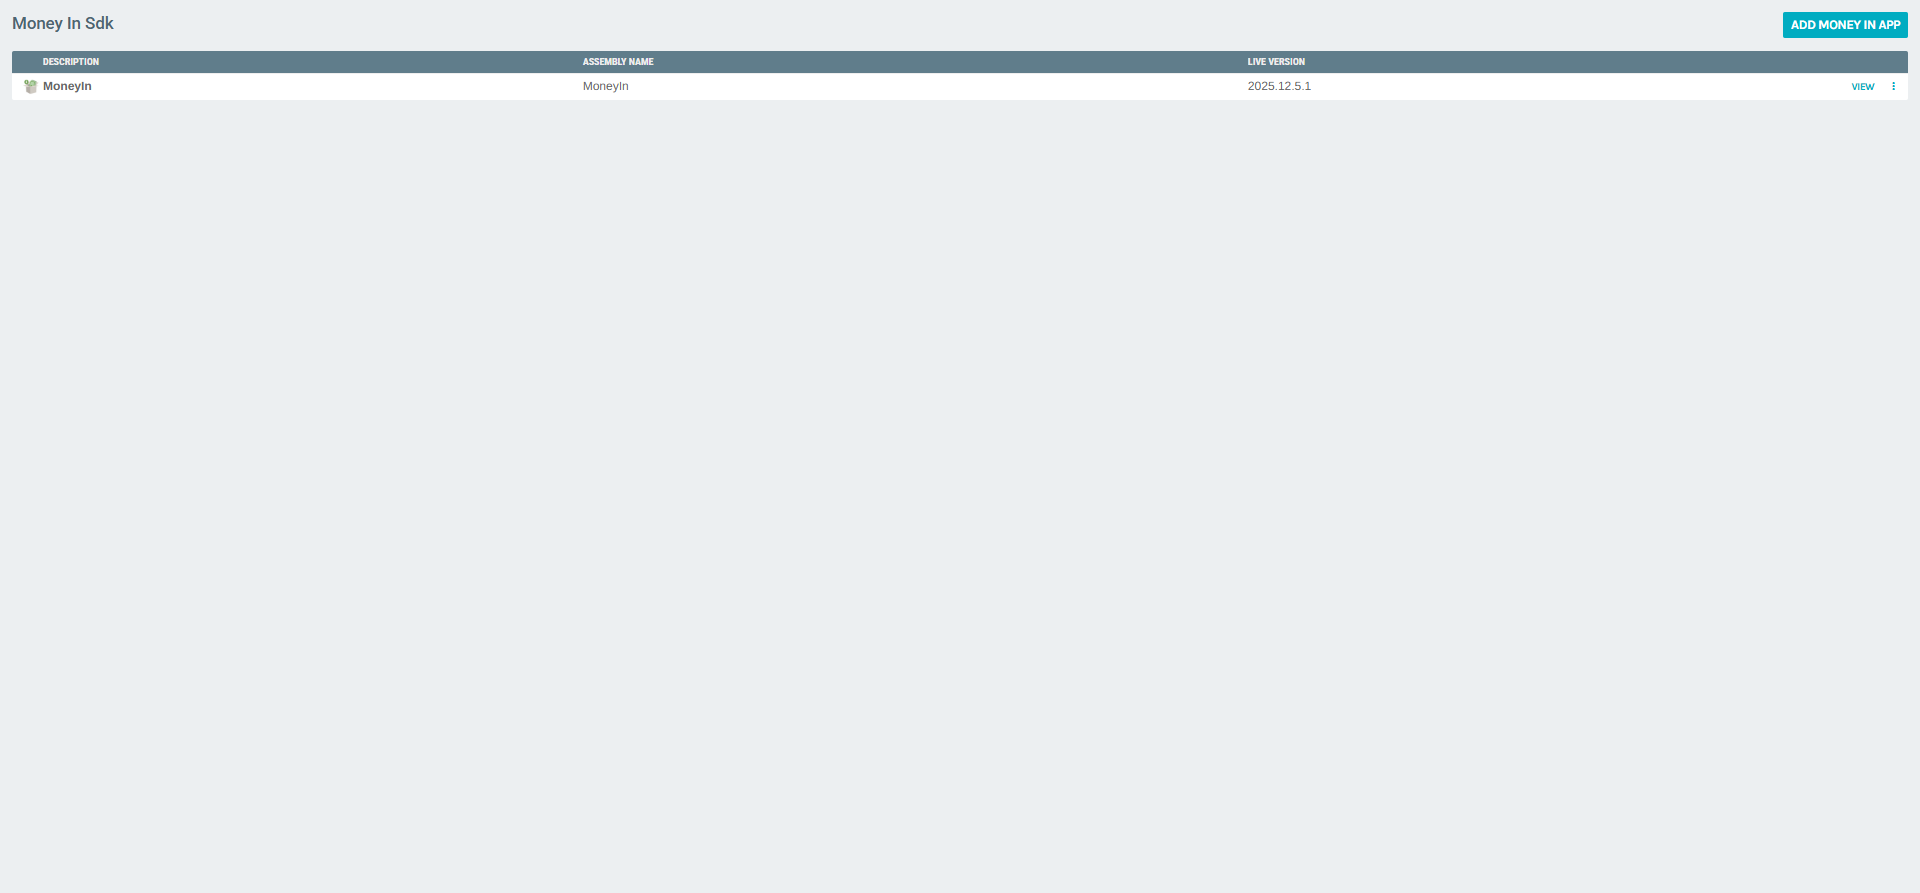
The Money In list displays all registered Money In SDK applications, along with:
| Column | Description |
|---|---|
| Description | The display name of the Money In app |
| Assembly Name | The compiled assembly identifier |
| Live Version | The currently deployed build version |
Click VIEW on any entry to access that app's portal.
Money In SDK Portal
Clicking VIEW on the Money In app opens the Money In SDK Portal, which provides access to:
- Build history and deployment tools
- Credit card testing tools
- Source code repository management
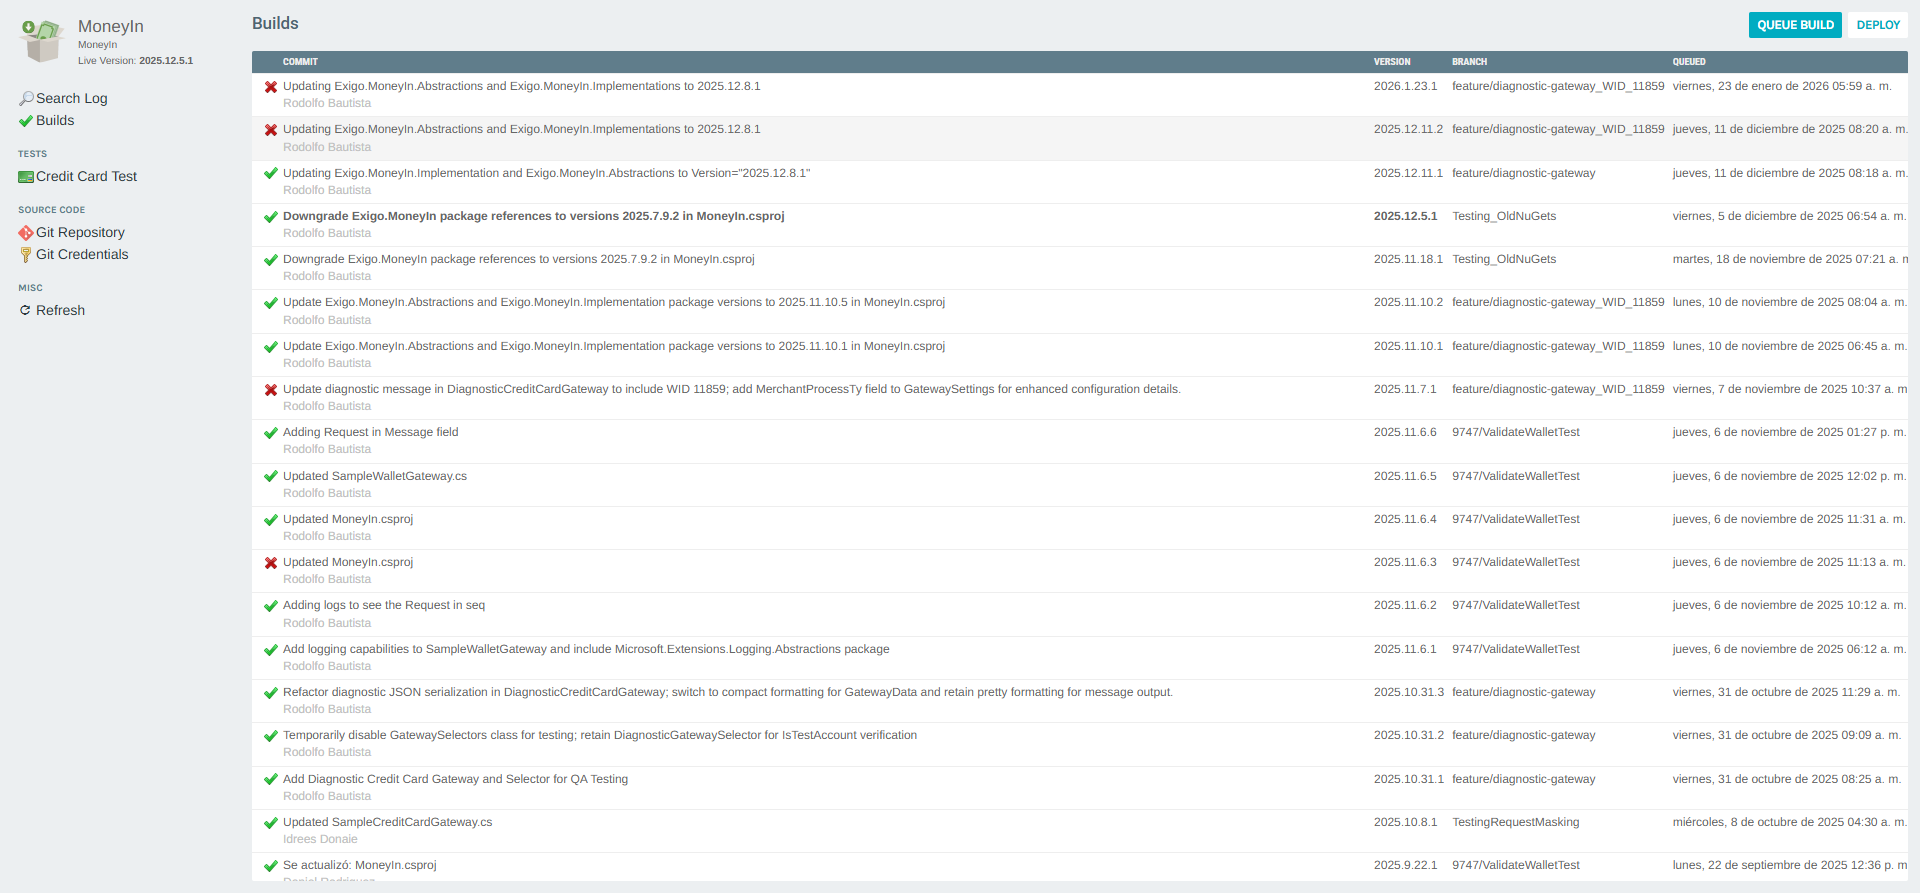
Tests
The Tests section provides a quick link to run a Credit Card Test against the currently configured merchant. This validates that the gateway credentials are correctly set up and that the payment flow is functional.
Source Code
The Source Code section links to:
- Git Repository — the source repository for the Money In SDK app
- Git Credentials — authentication credentials used to interact with the repository
Builds
The Builds panel shows the full history of deployments, including:
| Column | Description |
|---|---|
| Commit | The Git commit message and author |
| Version | The build version number |
| Branch | The Git branch from which the build was created |
| Queued | The date and time the build was queued |
Use the QUEUE BUILD button to trigger a new build from the latest source, and DEPLOY to promote a specific build to the live environment.
Configuring Merchants
Merchants define how payments are processed per warehouse and currency. This configuration is managed under Administration > Settings > Accounting Settings > Merchant.
Accessing the Merchant Tab
Navigation path: Administration > Settings > Accounting Settings > (Merchant tab)
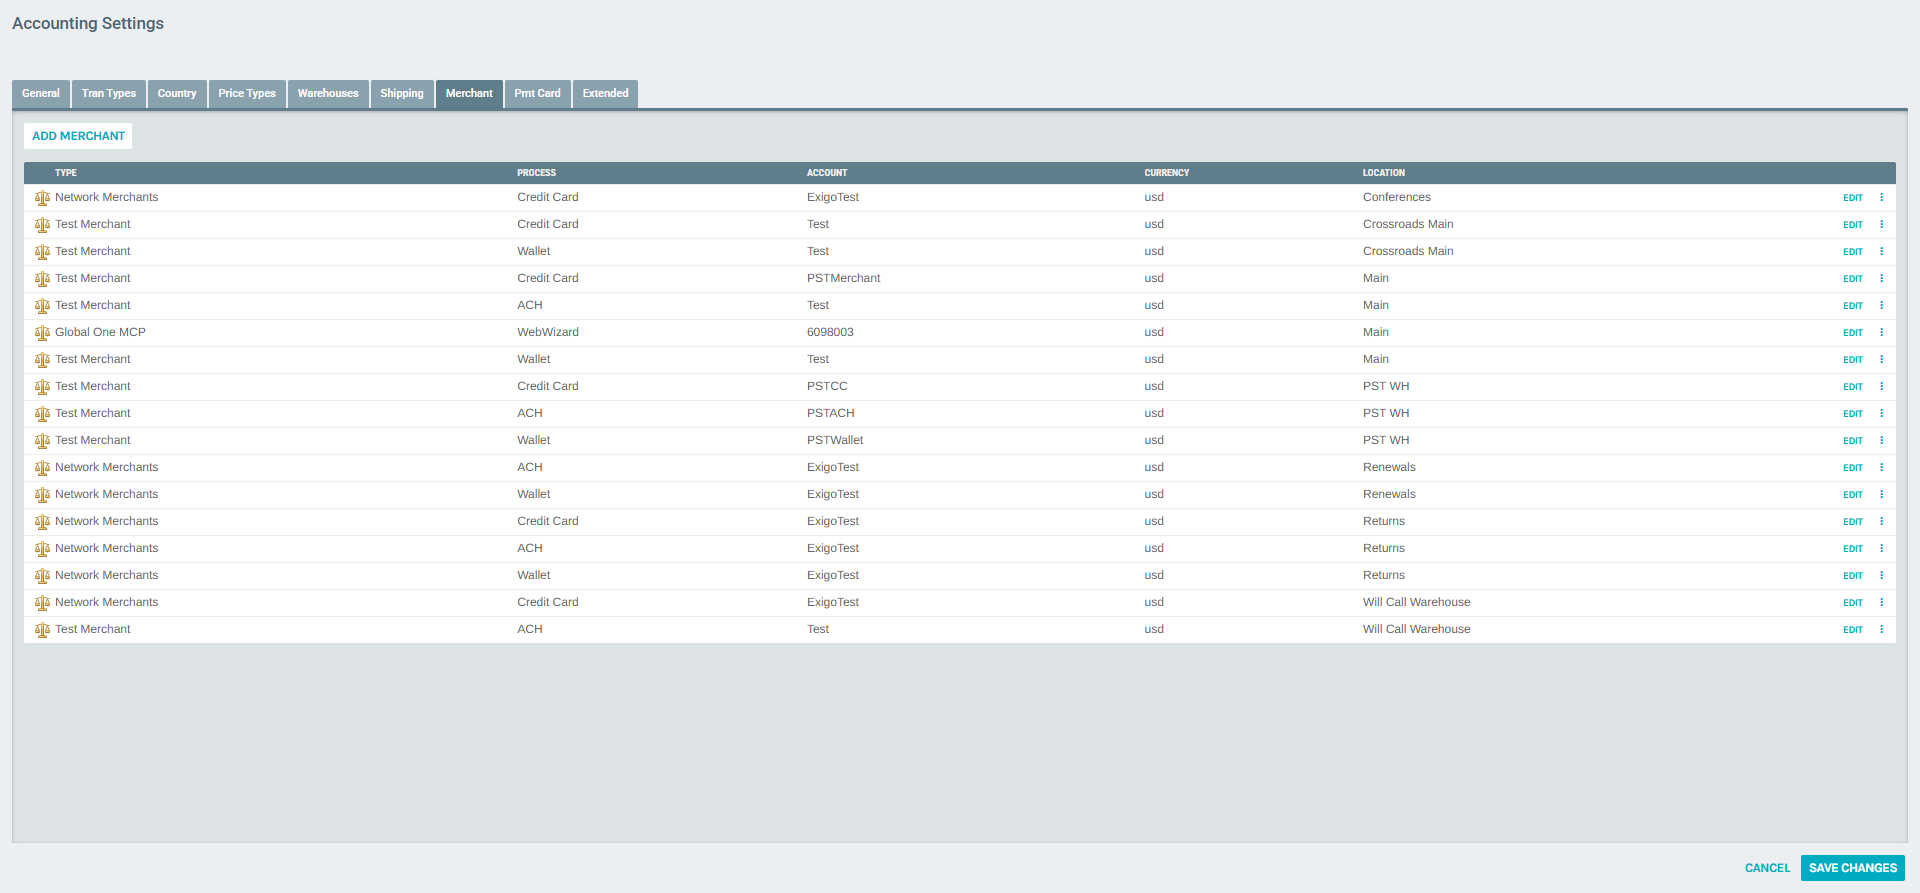
Merchant List
The Merchant tab displays all merchants currently configured for the company. Each row represents a unique combination of merchant type, process type, and warehouse/location.
| Column | Description |
|---|---|
| Type | The payment processor (e.g., Network Merchants, Test Merchant) |
| Process | The payment method (Credit Card, ACH, Wallet, WebWizard) |
| Account | The merchant account identifier |
| Currency | The currency code handled by this merchant (e.g., usd) |
| Location | The warehouse this merchant is assigned to |
Use the context menu (⋮) on each row to access additional options such as Delete.
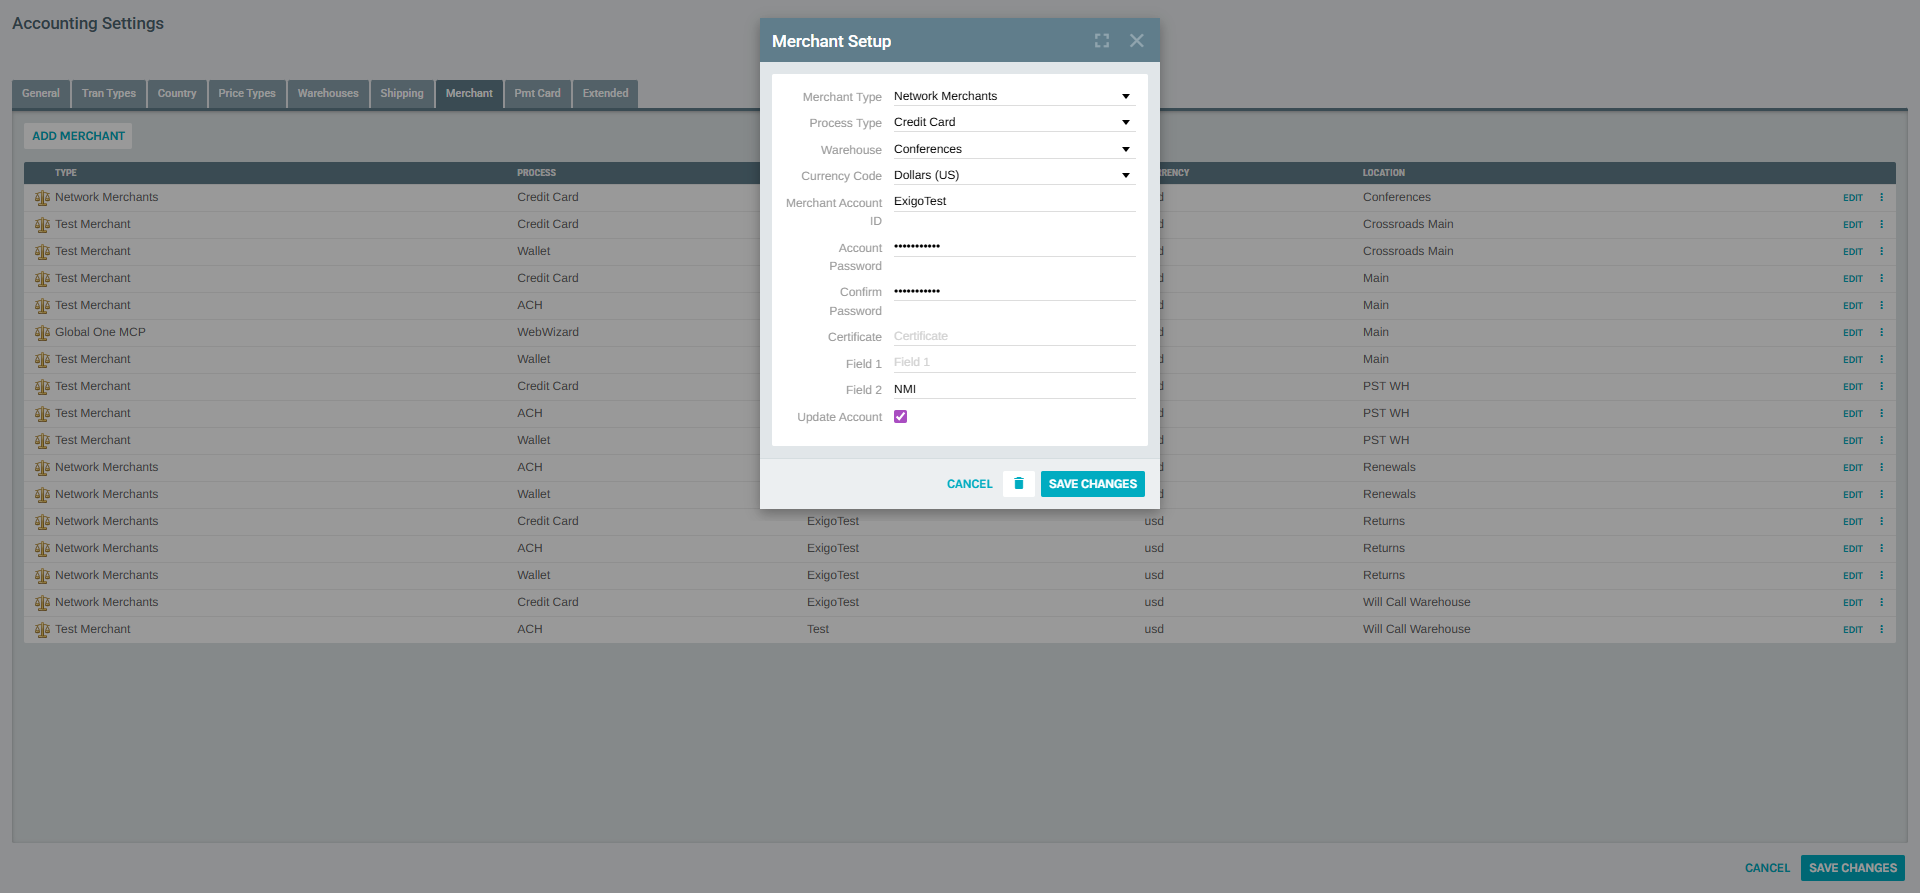
Adding a New Merchant
Click ADD MERCHANT at the top of the Merchant tab to open the Merchant Setup form for a new entry.
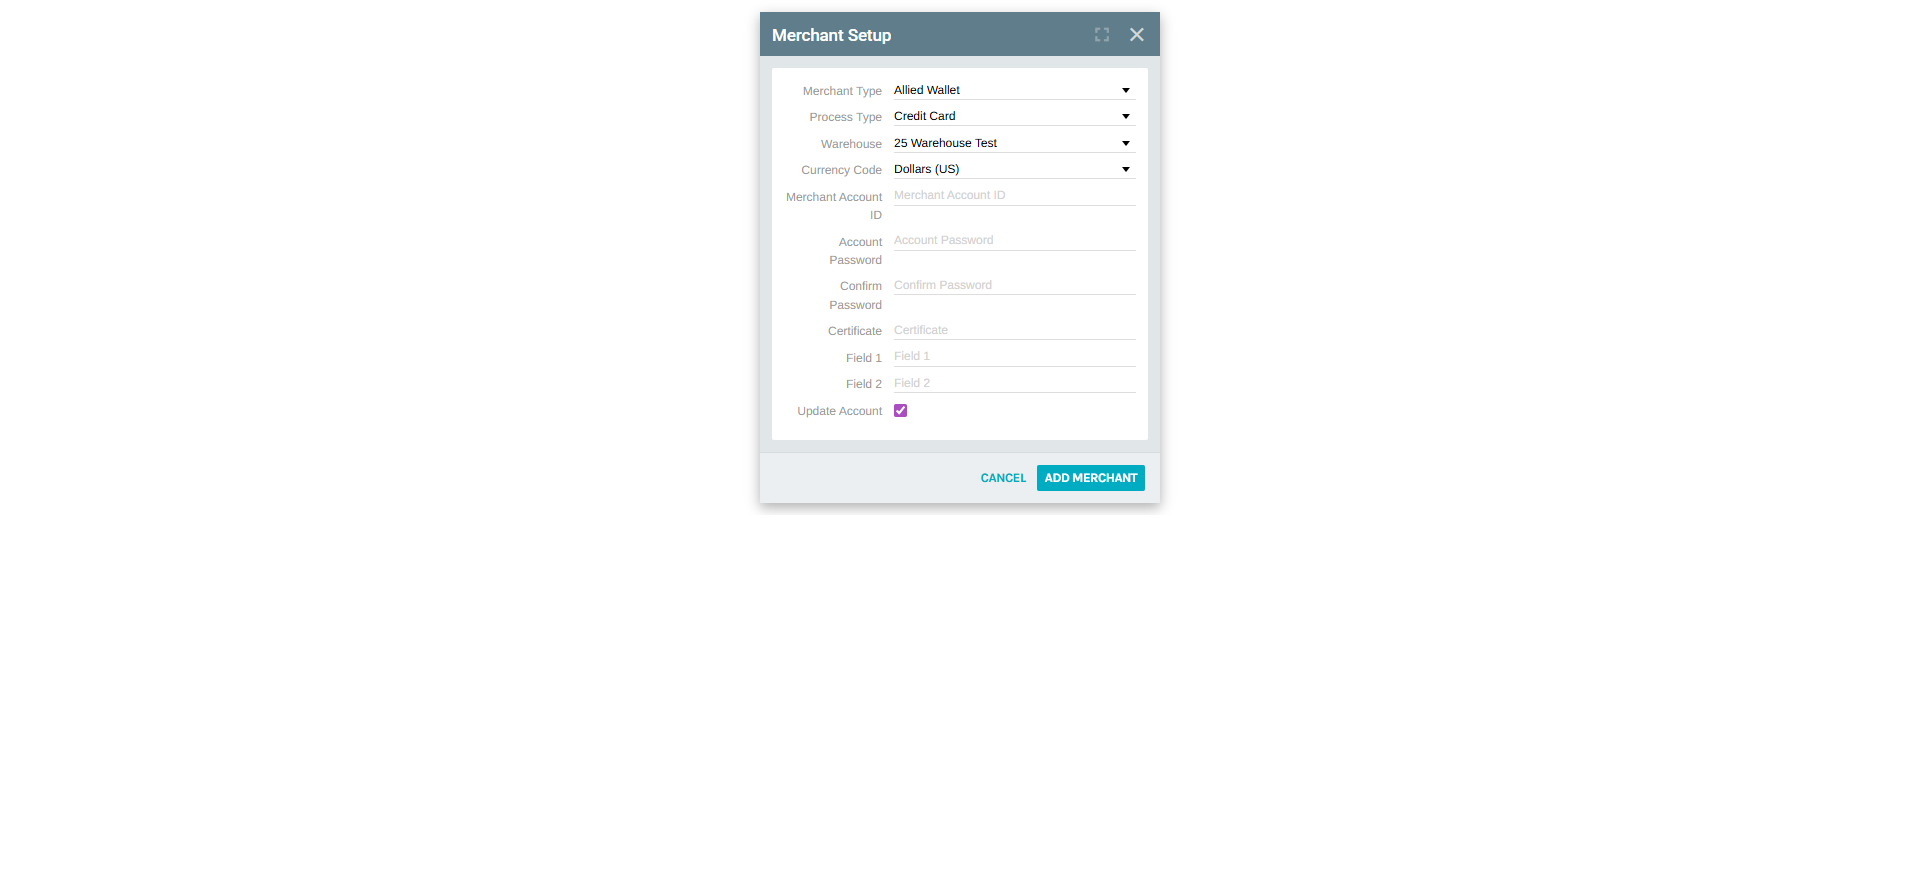
Fill in all required fields and click ADD MERCHANT to save the configuration.
Editing an Existing Merchant
Click EDIT next to any existing merchant to open its configuration form.
Modify the necessary fields and click SAVE CHANGES to apply the updates.
Merchant Field Reference
The following fields appear in both the Add and Edit Merchant forms:
| Field | Required | Description |
|---|---|---|
| Merchant Type | Yes | The third-party payment gateway provider. See Merchant Types for the full list. |
| Process Type | Yes | The type of payment transaction this merchant handles. See Process Types. |
| Warehouse | Yes | The warehouse location this merchant is assigned to. |
| Currency Code | Yes | The currency processed by this merchant (e.g., Dollars (US)). |
| Merchant Account ID | Yes | The account identifier provided by the payment processor. |
| Account Password | No | The password or secret key for the merchant account. |
| Confirm Password | No | Confirmation of the account password. |
| Certificate | Yes | A certificate value required by some payment gateways. |
| Field 1 | Yes | A gateway-specific configuration field (varies per provider). |
| Field 2 | Yes | A second gateway-specific configuration field. |
| Update Account | — | When checked, updates the live merchant account credentials upon save. |
Merchant Types
The Merchant Type dropdown contains all supported payment gateway integrations. Available options include:
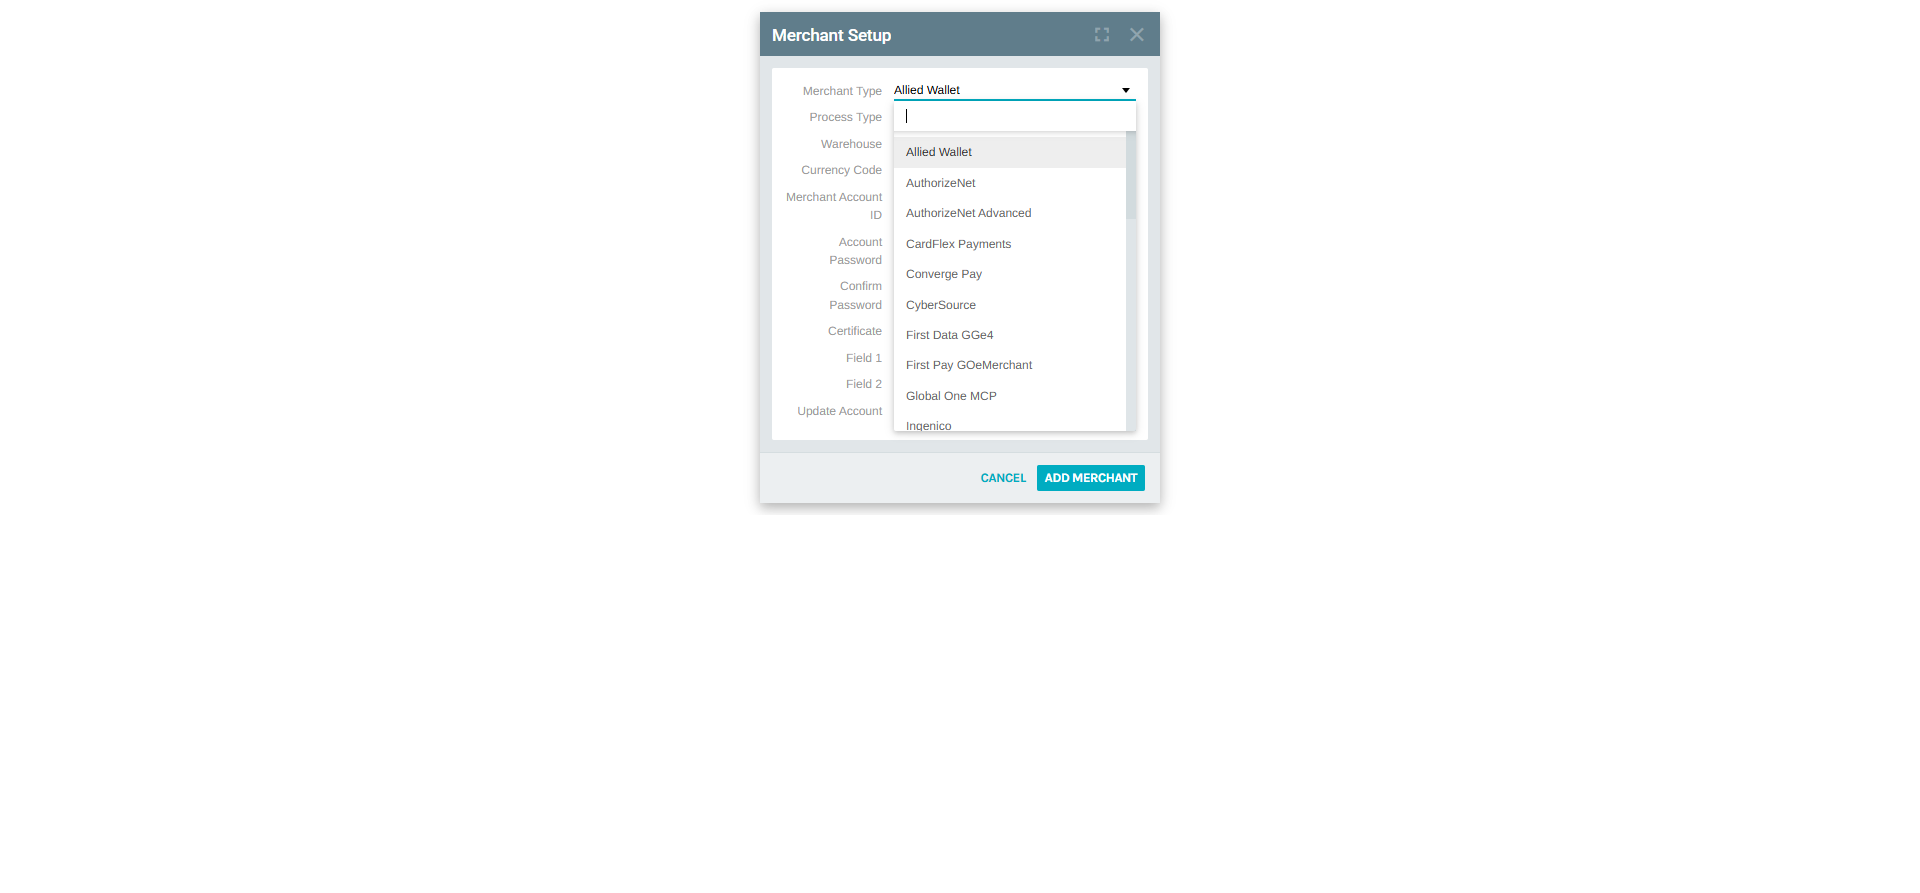
| Merchant Type | Description |
|---|---|
| Allied Wallet | Allied Wallet payment processing |
| AuthorizeNet | Authorize.Net standard gateway |
| AuthorizeNet Advanced | Authorize.Net with advanced configuration |
| CardFlex Payments | CardFlex payment gateway |
| Converge Pay | Converge by Elavon |
| CyberSource | CyberSource by Visa |
| First Data GGe4 | First Data Global Gateway e4 |
| First Pay GOeMerchant | First Pay / GOeMerchant |
| Global One MCP | Global One Multi-Currency Processing |
| Ingenico | Ingenico payment solutions |
| iPay Gateway | iPay88 gateway |
| KICC Korea | Korea Intelligent Credit Card gateway |
| LaCore | LaCore Payments |
| MassPay | MassPay disbursements and collections |
| Merchant Failover | Failover/redundancy configuration |
| Meritus | Meritus Payment Solutions |
| Moneris | Moneris (Canadian gateway) |
| Network Merchants | NMI Network Merchants gateway |
| Optimal Payment | Optimal Payments (Paysafe) |
| Payementure | Payementure gateway |
| Payflowpro | PayPal Payflow Pro |
| PaymentExpress | PaymentExpress DPS |
| Payoneer | Payoneer payment platform |
| PayPal | PayPal standard integration |
| PayVision | PayVision payment processing |
| PCG | PCG gateway |
| Public Bank Malaysia | Public Bank (Malaysia) |
| QuickCard | QuickCard prepaid solutions |
| RocketGate | RocketGate billing platform |
| Test Merchant | Test/sandbox environment |
| VeriCheck | VeriCheck ACH processing |
| Viking | Viking payment processing |
| Wirecard | Wirecard payment solutions |
Process Types
The Process Type dropdown defines the payment method handled by the merchant:

| Process Type | Description |
|---|---|
| ACH | Automated Clearing House — electronic bank transfers |
| Credit Card | Standard credit and debit card payments |
| Wallet | Digital wallet payments (e.g., stored value accounts) |
| WebWizard | WebWizard-based payment flow (e.g., Global One MCP) |
Note: A single merchant can only handle one process type. To support multiple payment methods with the same gateway, create separate merchant entries for each process type.
Payment Card Accounts (Pmt Card)
The Pmt Card tab under Accounting Settings manages payout or payment card account integrations, separate from the incoming payment merchants.
Navigation path: Administration > Settings > Accounting Settings > (Pmt Card tab)
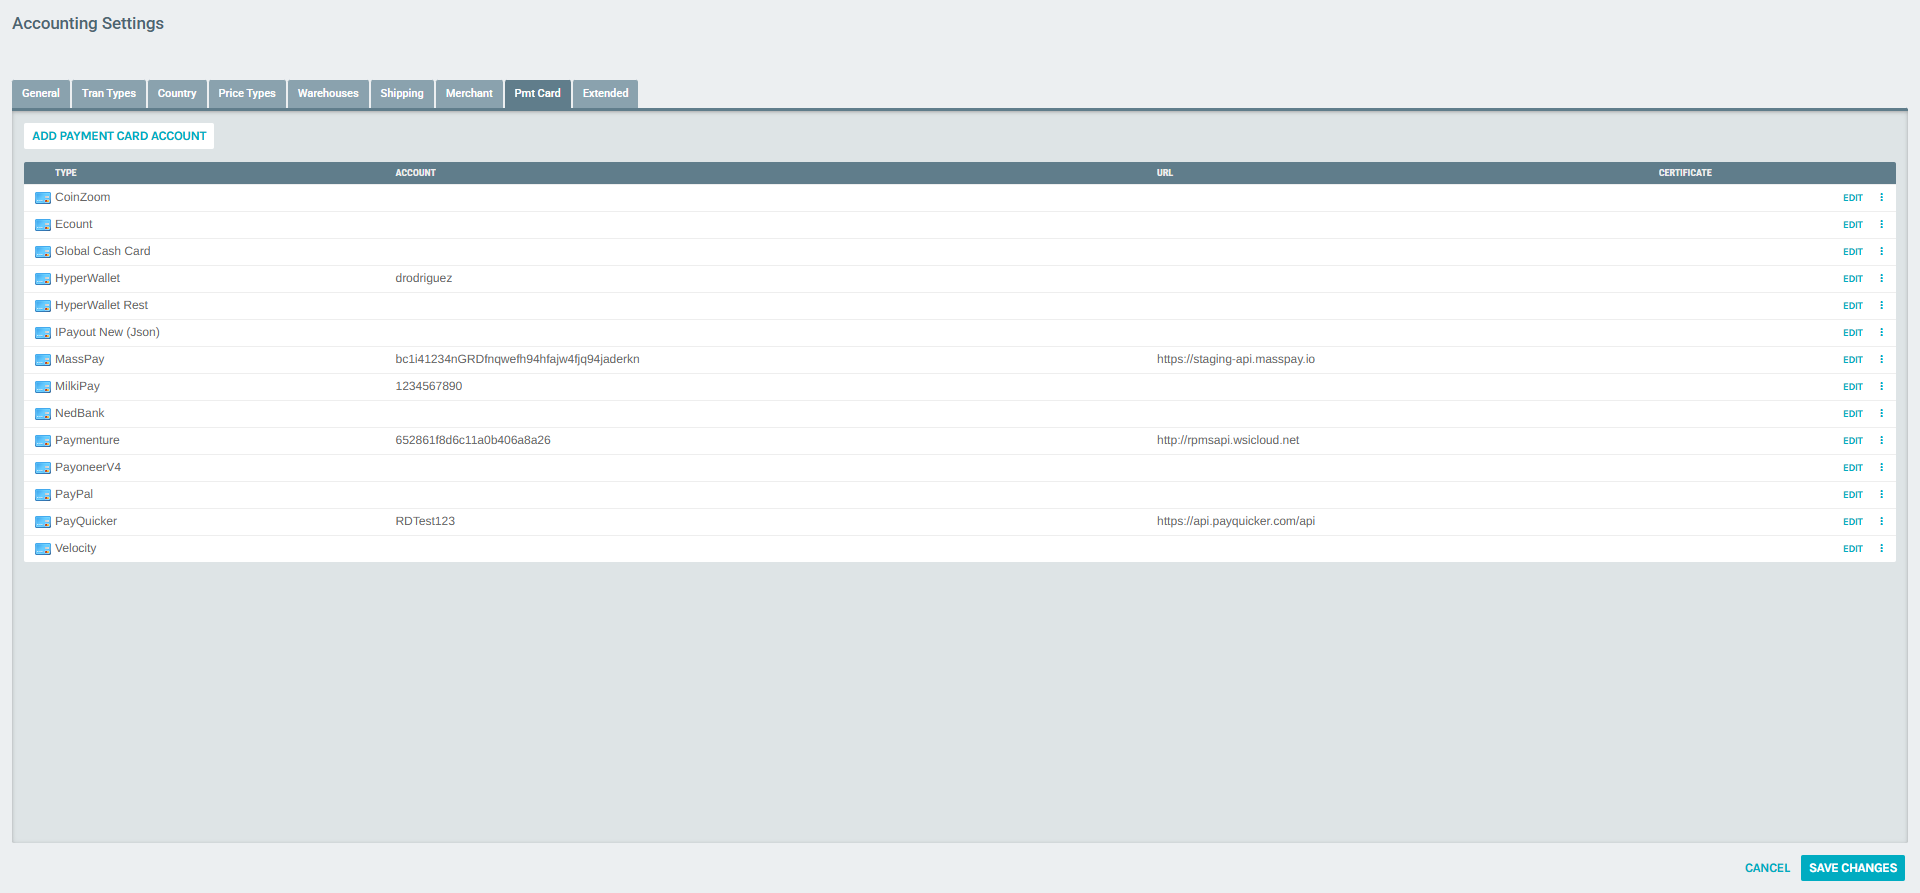
The Pmt Card list shows all configured providers with the following columns:
| Column | Description |
|---|---|
| Type | The payment card provider (e.g., HyperWallet, PayQuicker, MassPay) |
| Account | The account identifier for this provider |
| URL | The API endpoint URL used for integration |
| Certificate | Any certificate or key value associated with the account |
Click ADD PAYMENT CARD ACCOUNT to add a new provider, or EDIT on an existing entry to modify it.
Monitoring Transactions (Money In Log)
The Money In Log provides a transaction audit trail for all payment attempts processed through the Money In SDK.
Navigation path: Sdk > Money In > (VIEW) > Search Log
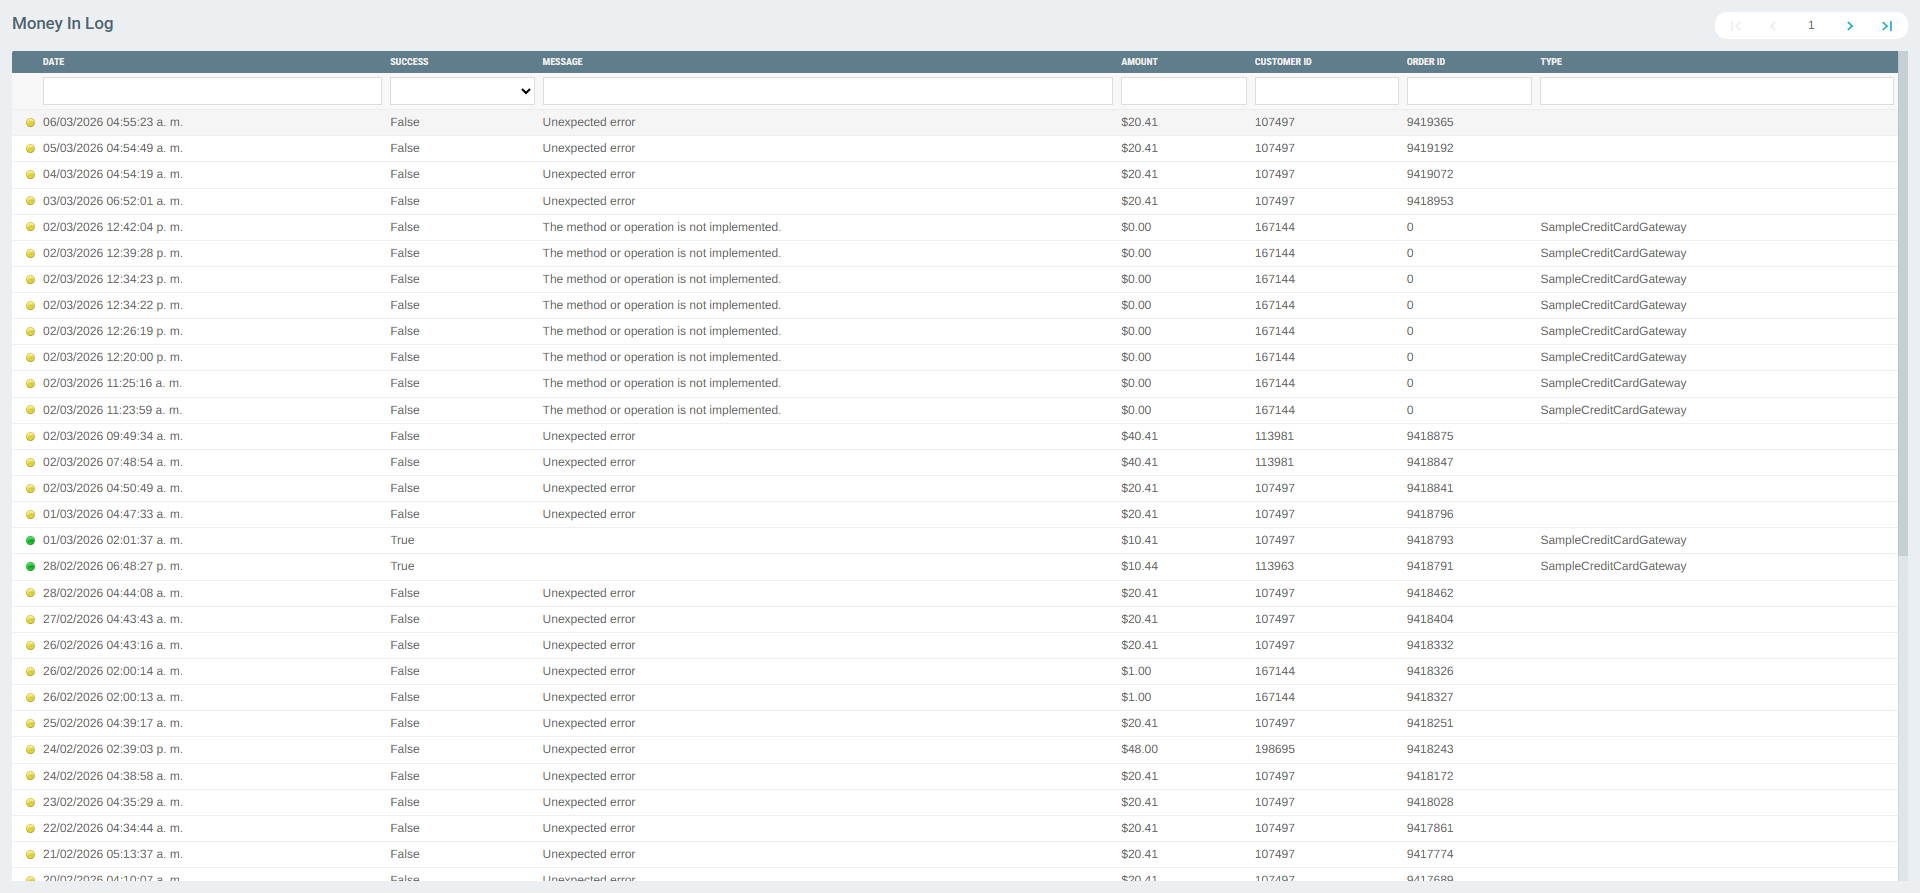
The log displays the following columns:
| Column | Description |
|---|---|
| Date | The date and time of the transaction attempt |
| Success | Whether the transaction succeeded (True) or failed (False) |
| Message | The result or error message from the payment gateway |
| Amount | The transaction amount |
| Customer ID | The Exigo customer ID associated with the transaction |
| Order ID | The order number linked to the transaction |
| Type | The Money In gateway type used (e.g., SampleCreditCardGateway, SampleAchGateway) |
Use the search and filter fields at the top of each column to narrow results by date range, success status, message content, amount, customer ID, or order ID.