IP Whitelist Management Documentation
This document provides a comprehensive guide for managing IP Whitelist rules in the Exigo Admin portal.
Table of Contents
- Overview
- Accessing IP Whitelist Settings
- Understanding IP Whitelist vs Admin Login IP Restrictions
- Viewing IP Whitelist Rules
- Adding a New IP Whitelist Rule
- Adding an External Resource (IP Monitor)
- Editing an IP Whitelist Rule
- Deleting an IP Whitelist Rule
- Best Practices
Overview
IP Whitelist management allows you to control which IP addresses can access your Exigo system's API and external resources. This is a critical security feature that helps protect your system from unauthorized access.
Key Features: - Whitelist specific IP addresses or IP ranges - Set expiration dates for temporary access - Monitor external resources connecting to your system - Quick add feature for your current IP address
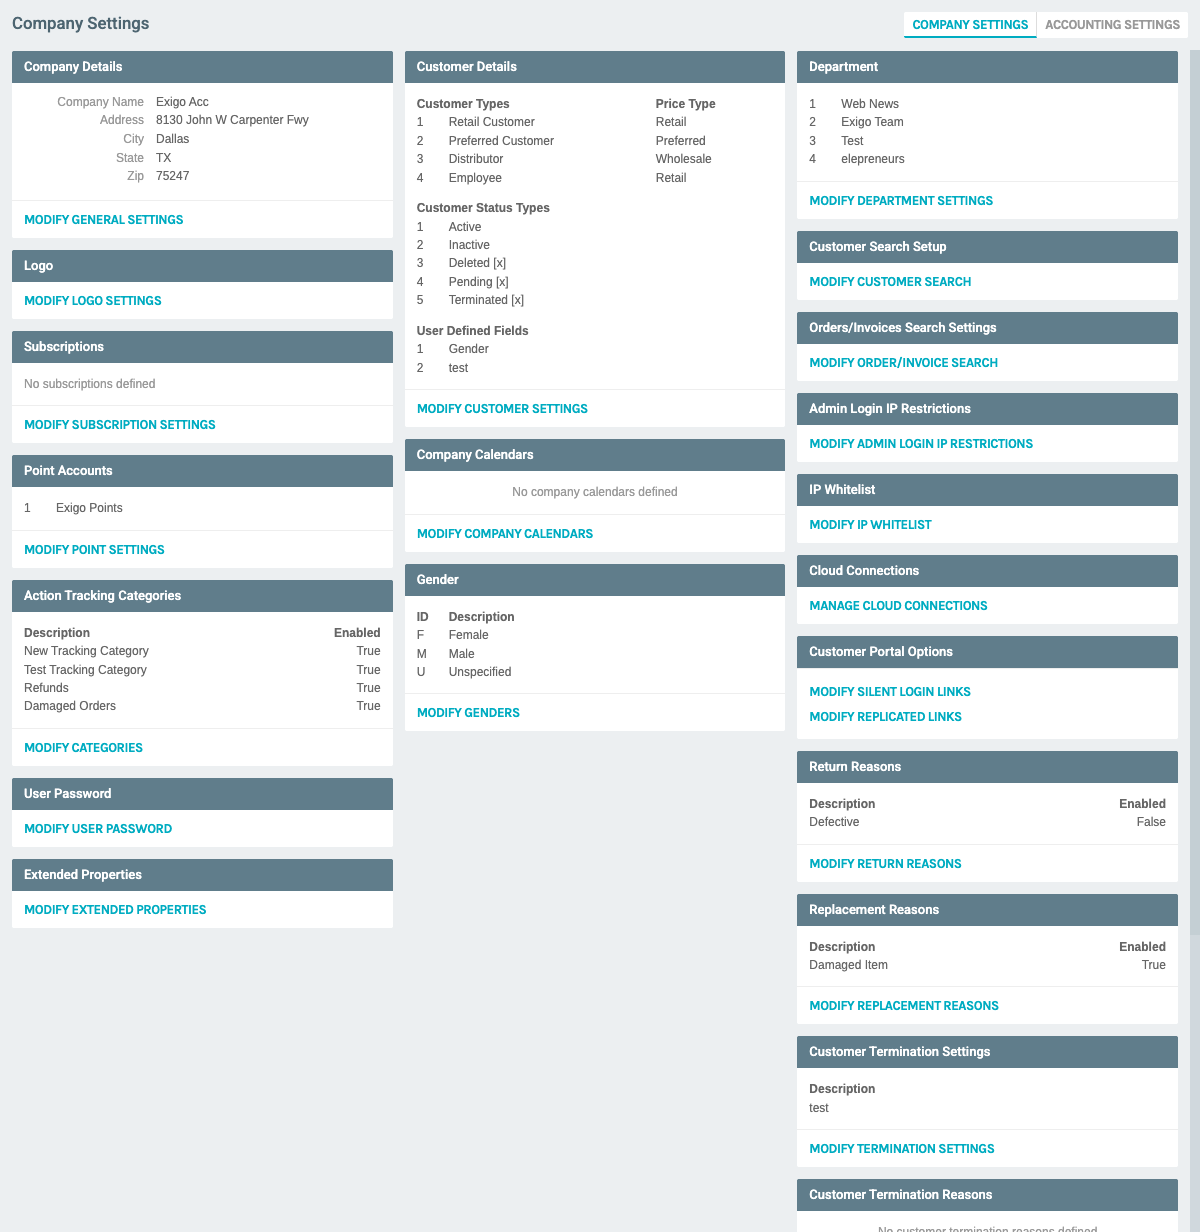
Accessing IP Whitelist Settings
Navigation Path
- Log in to the Exigo Admin portal at
login.exigo.com - From the main menu, navigate to Administration > Settings
- Scroll down to find two IP-related sections:
- Admin Login IP Restrictions - Controls who can log into the admin portal
- IP Whitelist - Controls API and external resource access
- Click on MODIFY IP WHITELIST
Understanding IP Whitelist vs Admin Login IP Restrictions
IP Whitelist: - Controls API access to your Exigo system - Used for external integrations, web services, and automated systems - Applies to programmatic access (not human logins)
Admin Login IP Restrictions: - Controls access to the admin portal login page - Used to restrict which locations administrators can log in from - Applies to human user logins
Viewing IP Whitelist Rules
Once you click "MODIFY IP WHITELIST", a modal window opens displaying all current IP whitelist rules.

Page Elements:
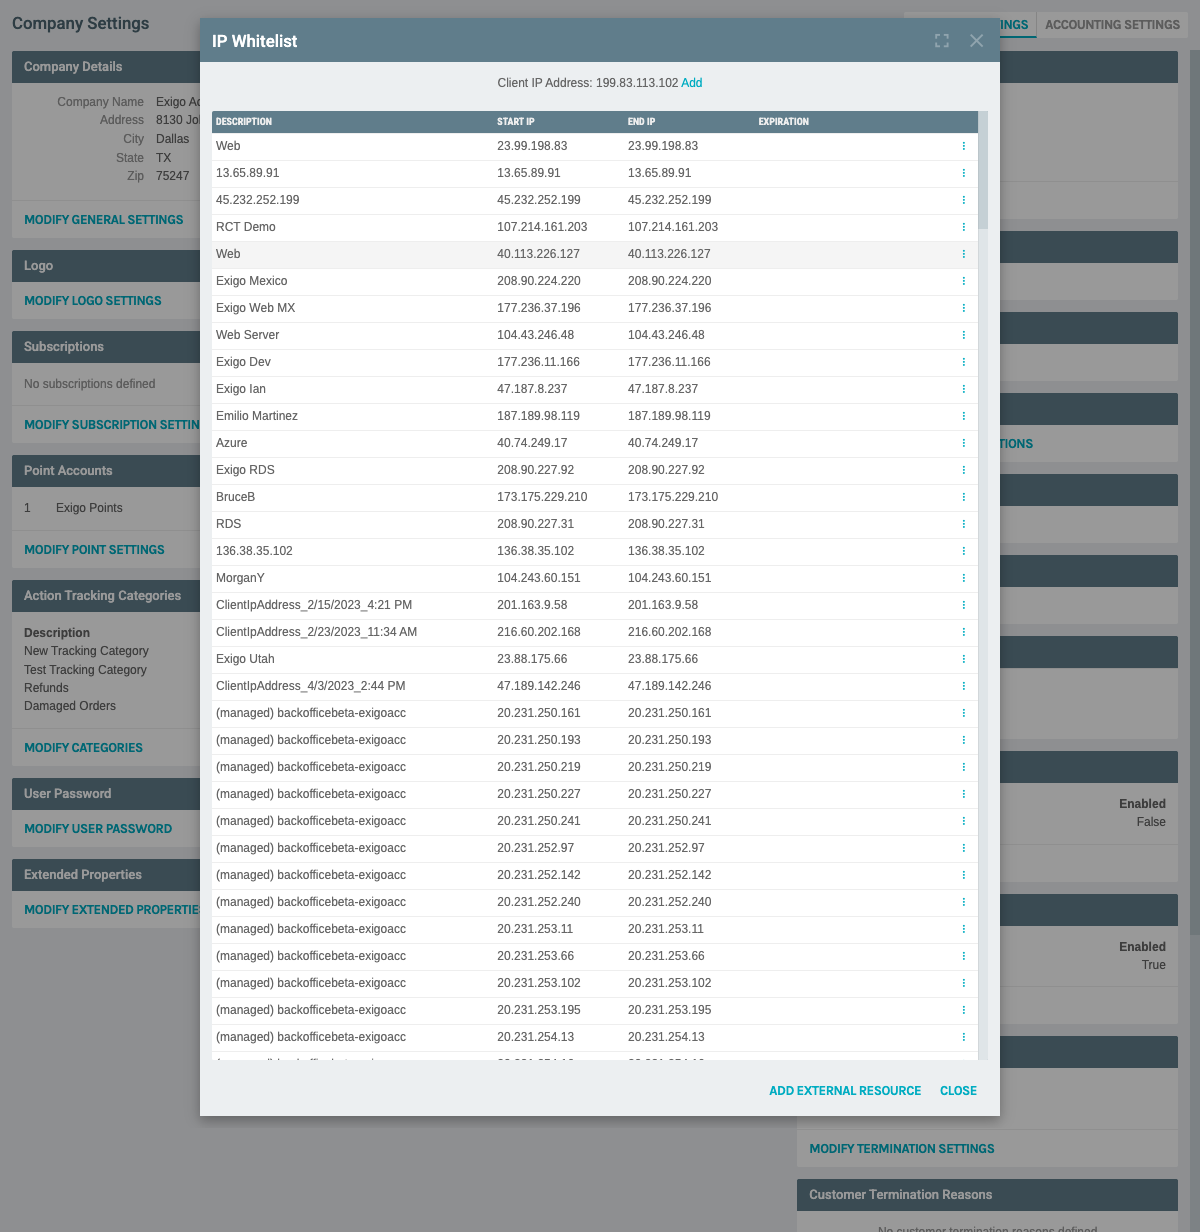
Header Information: - Title: "IP Whitelist" - ADD EXTERNAL RESOURCE button: For monitoring cloud connections - Client IP Address: Shows your current IP address with a quick "Add" link - Add IP Whitelist Rule link: At the bottom of the list for adding new rules
Table Columns: - DESCRIPTION: Name or description of the IP whitelist entry - START IP: The starting IP address in the range - END IP: The ending IP address in the range (same as Start IP for single addresses) - EXPIRATION: Optional expiration date for temporary access - Actions: Edit and delete options via three dots menu
Adding a New IP Whitelist Rule
Method 1: Quick Add Current IP
If you need to add your current IP address:
- Look for the "Client IP Address" display at the top of the IP Whitelist modal
- Click the "Add" link next to your displayed IP address
- The form will pre-fill with your current IP address
Method 2: Manual Add
To add any IP address or range:
- Scroll to the bottom of the IP whitelist list
- Click "Add IP Whitelist Rule"
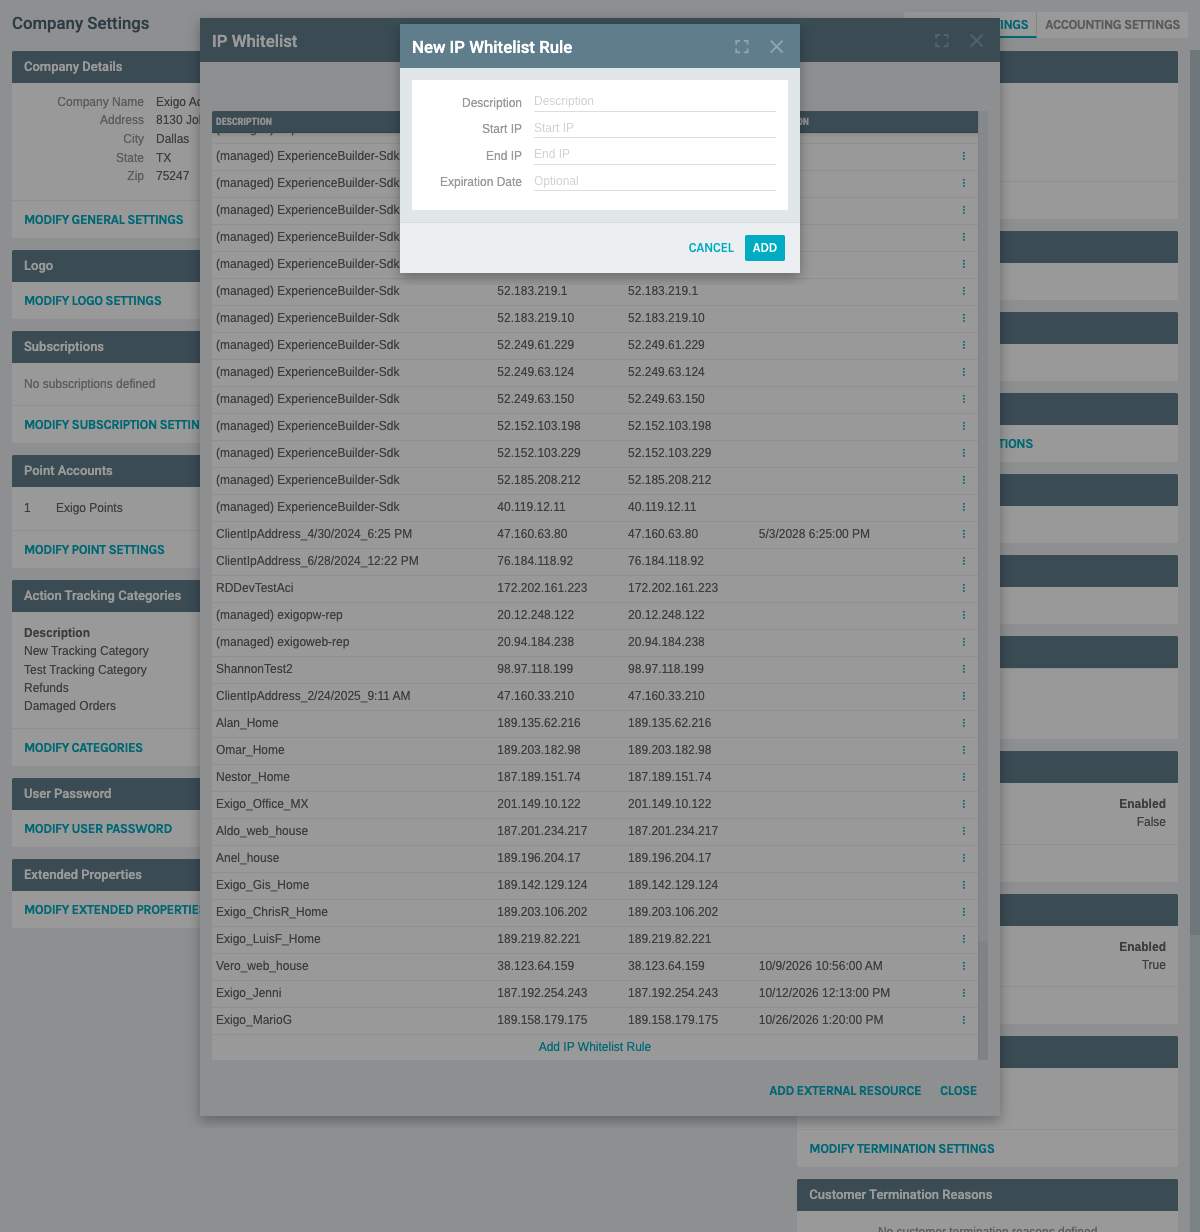
- The "New IP Whitelist Rule" form appears with the following fields:
Required Fields: - Description: Enter a meaningful name (e.g., "Test Documentation IP", "Office Network", "Development Server") - Start IP: Enter the starting IP address (e.g., "192.168.1.100") - End IP: Enter the ending IP address - For a single IP: Use the same address as Start IP - For a range: Use the last IP in the range (e.g., "192.168.1.200") - Expiration Date: Optional - Set a date when this rule should expire
- Fill in the form:
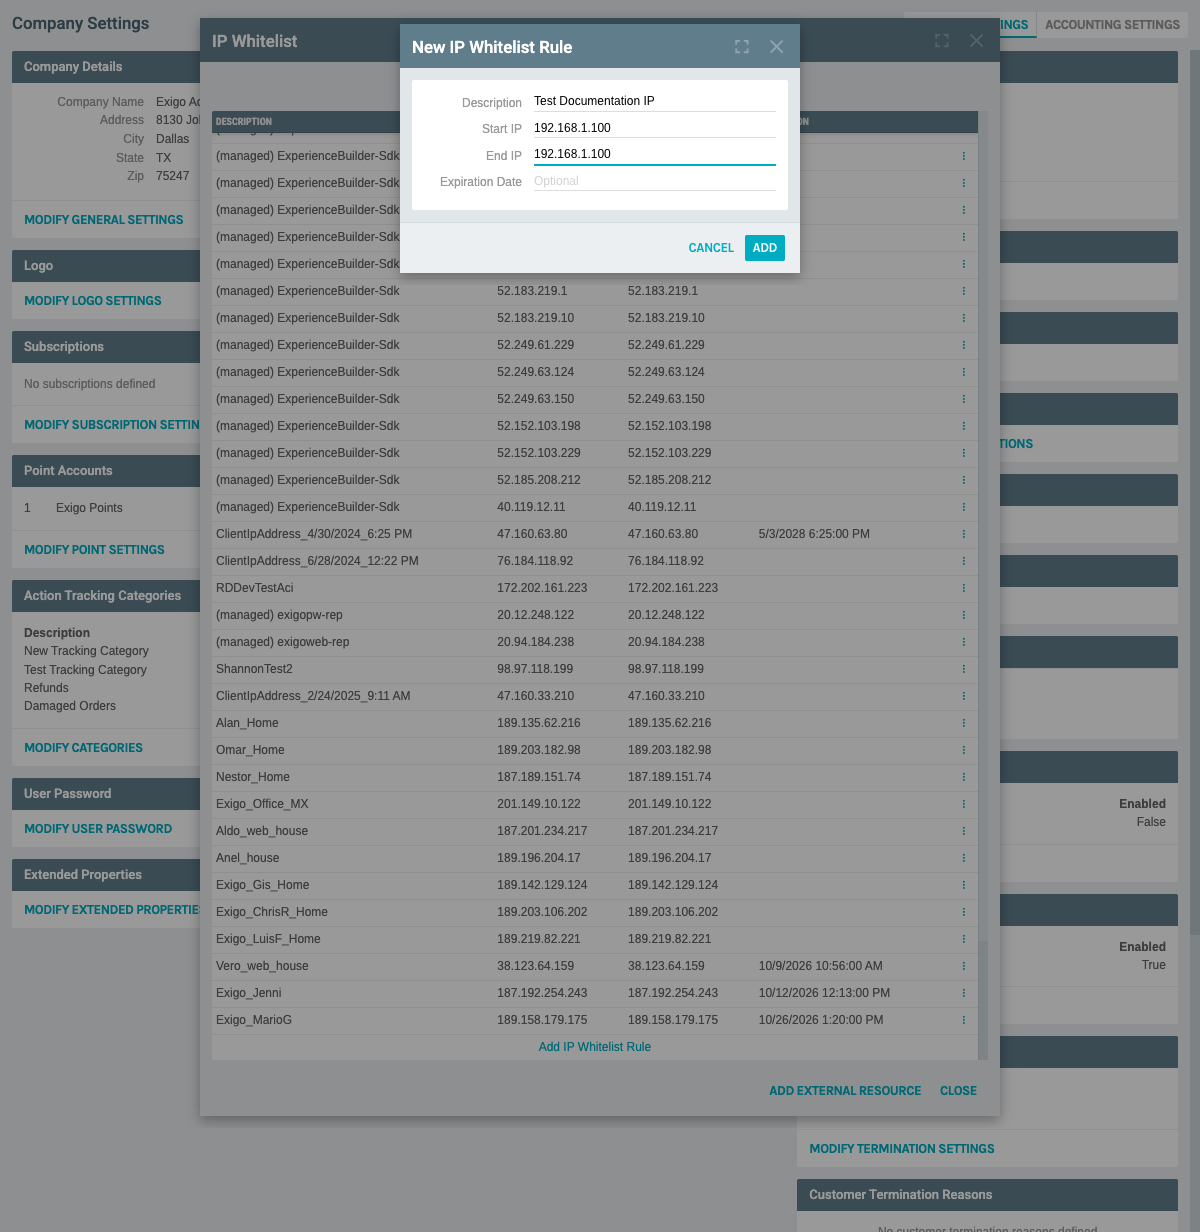
Example: - Description: "Test Documentation IP" - Start IP: "192.168.1.100" - End IP: "192.168.1.100" - Expiration Date: (leave blank for no expiration)
-
Click "ADD" to save the new rule
-
The new IP whitelist rule appears in the list:
Note: The new entry will be added to the bottom of the list.
Adding an External Resource (IP Monitor)
External Resources allow you to monitor and whitelist IP addresses from your cloud connections.
- Click "ADD EXTERNAL RESOURCE" at the top of the IP Whitelist modal
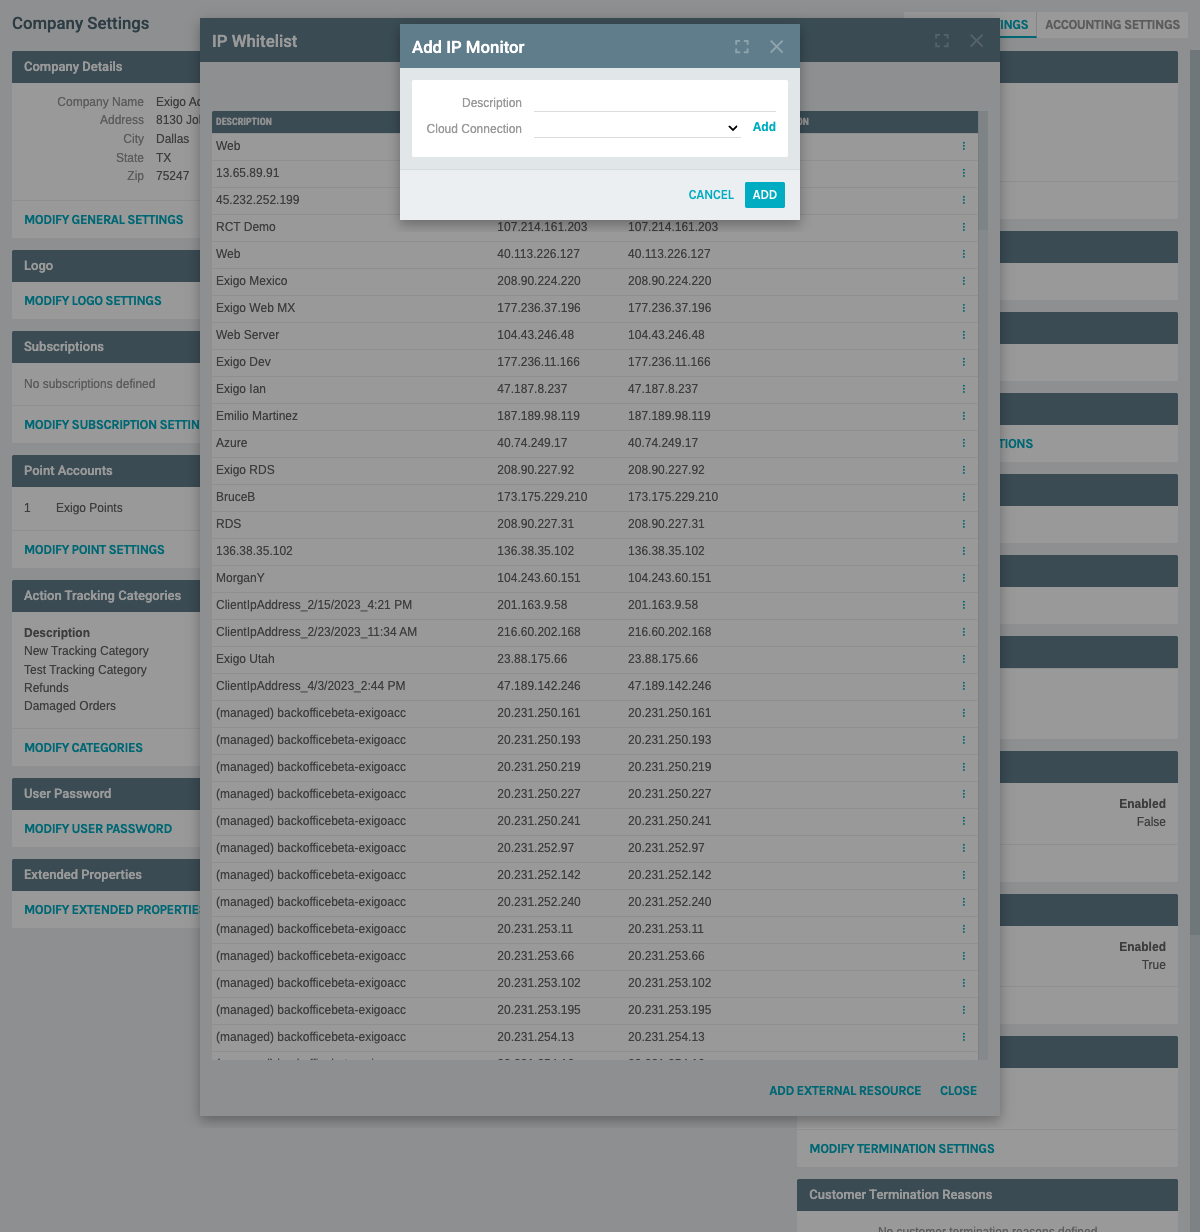
- The "Add IP Monitor" form appears:
Form Fields: - Description: Name for this monitoring rule - Cloud Connection: Select from your configured cloud connections: - Implementation Subscription (Azure) - R&D (Azure) - Beta Backoffice (Azure) - Clients Subscription (Azure) - Add link: Create a new cloud connection if needed
-
Fill in the description and select a cloud connection
-
Click "ADD" to create the monitoring rule
Use Case: This feature is useful for automatically tracking and whitelisting IPs from your Azure subscriptions or other cloud providers.
Editing an IP Whitelist Rule
Steps to Edit:
-
From the IP Whitelist list, locate the rule you want to modify
-
Click the three dots menu (⋮) button on the right side of the row

The menu displays two options: - Edit: Modify the whitelist rule - Delete: Remove the whitelist rule
- Click "Edit"
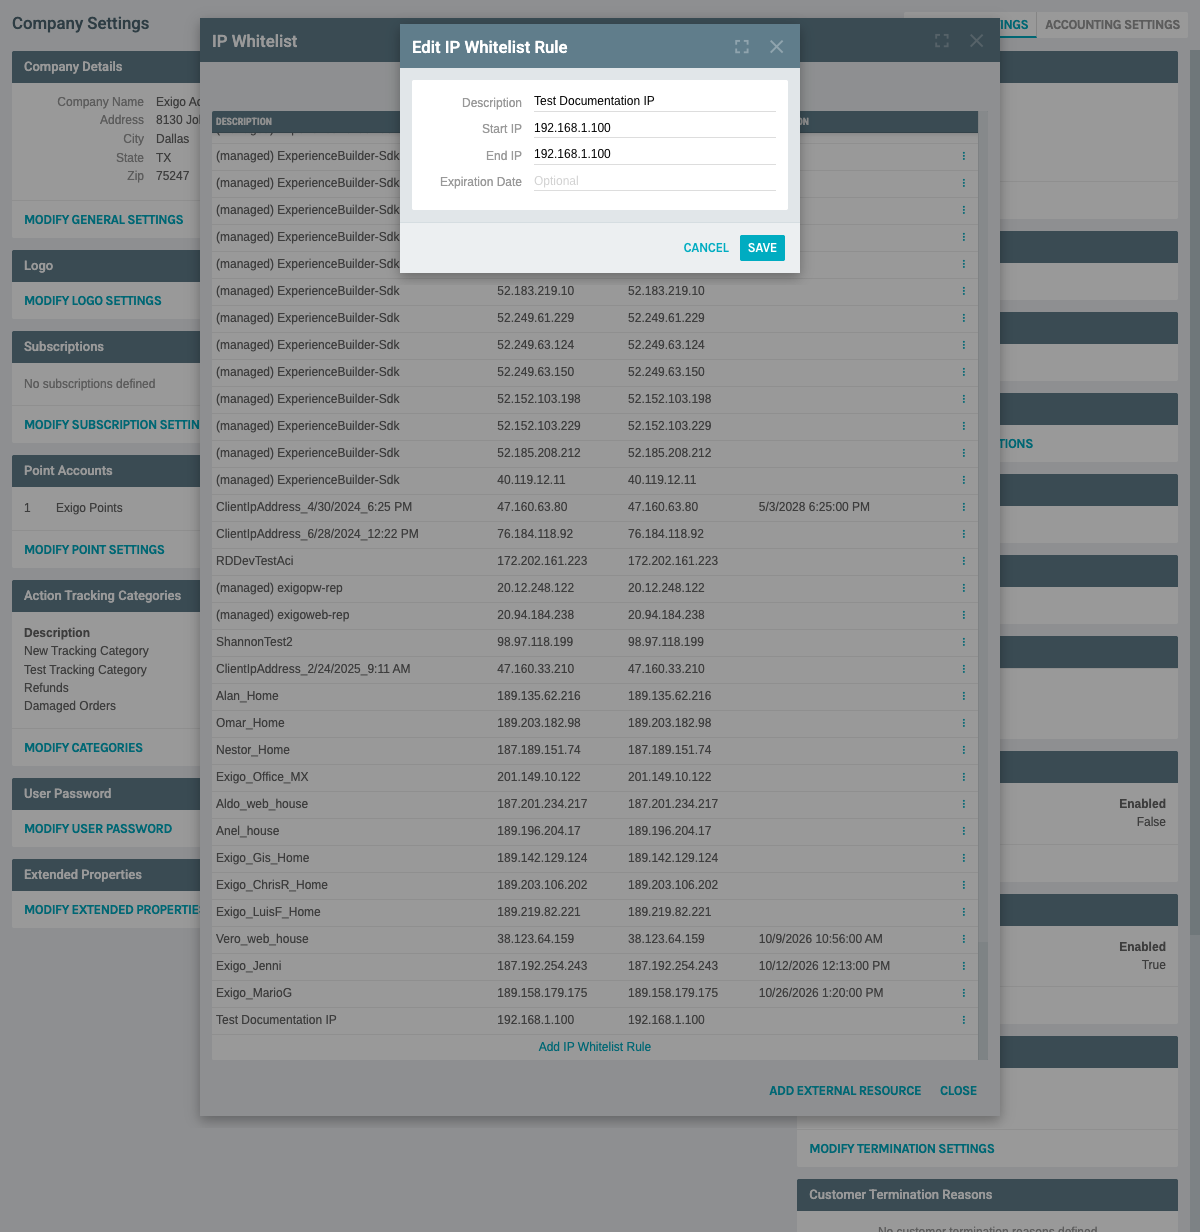
- The "Edit IP Whitelist Rule" form appears with pre-filled values:
- Description: Current description
- Start IP: Current start IP address
- End IP: Current end IP address
-
Expiration Date: Current expiration (if set)
-
Make your desired changes
-
Click "SAVE" to apply the modifications
-
Click "CANCEL" to discard changes
Common Edits: - Update description for clarity - Extend or change the IP range - Add or modify expiration date - Change a single IP to an IP range (or vice versa)
Deleting an IP Whitelist Rule
Steps to Delete:
-
Locate the IP whitelist rule you want to remove
-
Click the three dots menu (⋮) button on the right side of the row
-
Click "Delete" from the dropdown menu
-
A confirmation dialog appears:
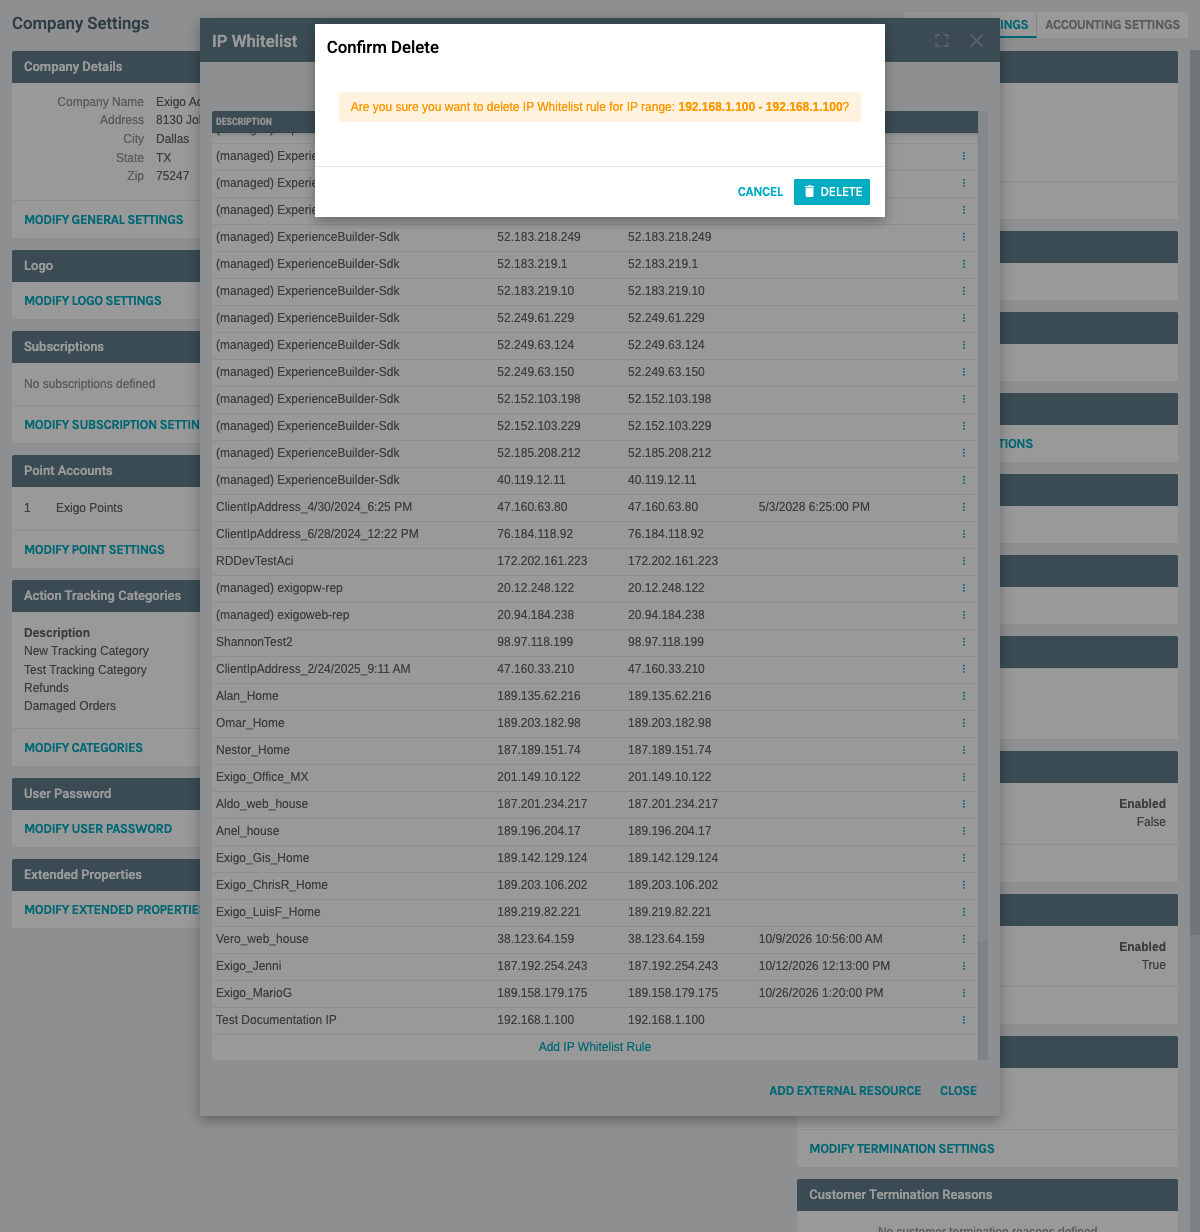
The dialog displays: - Message: Confirmation prompt asking if you want to delete the rule - DELETE button: Confirms and removes the rule permanently - CANCEL button: Aborts the deletion
-
Click "DELETE" to permanently remove the IP whitelist rule
-
Click "CANCEL" if you want to keep the rule
⚠️ Warning: - Deleting an IP whitelist rule is permanent and cannot be undone - Removing an IP address will immediately block API access from that address - Make sure no active integrations are using the IP address before deleting - Consider disabling (by setting an expiration date in the past) instead of deleting for audit purposes
Best Practices
Security Recommendations
- Use Descriptive Names
- Always use clear, meaningful descriptions
-
Include the purpose or system name (e.g., "Production Web Server", "Dev Team VPN", "Client XYZ Integration")
-
Minimize IP Ranges
- Only whitelist the specific IPs you need
- Avoid whitelisting entire subnets unless necessary
-
Use single IP addresses when possible
-
Set Expiration Dates
- Use expiration dates for temporary access (contractors, testing, temporary integrations)
- Review and extend as needed rather than using permanent access
-
Regular expiration forces periodic security reviews
-
Regular Audits
- Review your IP whitelist quarterly
- Remove unused entries
- Update descriptions as systems change
-
Verify that all entries are still needed
-
Documentation
- Keep external documentation of why each IP is whitelisted
- Note the system or person associated with each entry
- Track when entries were added and by whom
Operational Best Practices
- Test Before Production
- Add test IPs before deployment
- Verify connectivity works as expected
-
Remove test entries after validation
-
Use IP Monitors for Cloud
- Leverage the External Resource feature for cloud-based integrations
-
This helps track dynamic IP changes from cloud providers
-
Quick Add Current IP
- Use the quick add feature when troubleshooting
- Remember to give it a proper description
-
Set an expiration date if it's temporary
-
Backup Your List
- Periodically export or document your IP whitelist
- This helps with disaster recovery
- Makes it easier to migrate to new environments
Common Scenarios
Scenario 1: Adding Office Network
Description: "Company Office - Main Location"
Start IP: "203.0.113.10"
End IP: "203.0.113.20"
Expiration: (none)
Scenario 2: Temporary Contractor Access
Description: "Contractor - John Doe - Project ABC"
Start IP: "198.51.100.50"
End IP: "198.51.100.50"
Expiration: "03/31/2026" (end of project)
Scenario 3: Cloud Integration
Description: "Azure Functions - Order Processing"
Use: ADD EXTERNAL RESOURCE
Cloud Connection: "Production Subscription (Azure)"
Scenario 4: Development Server
Description: "Dev Server - api.dev.example.com"
Start IP: "192.0.2.100"
End IP: "192.0.2.100"
Expiration: (none)
Troubleshooting
API Access Denied
If you receive API access denied errors:
- Verify the IP address making the request
- Check if that IP is in the whitelist
- Confirm the IP range includes the address
- Check if the rule has expired
- Try the "Add Current IP" quick add feature if troubleshooting
Can't Add IP Address
If you cannot add an IP address:
- Verify the IP format is correct (IPv4: xxx.xxx.xxx.xxx)
- Ensure Start IP and End IP are in the correct order
- Check for overlapping IP ranges
- Confirm you have proper permissions
System Notes
- IP whitelist rules apply immediately upon saving
- Changes may take up to 60 seconds to propagate across all servers
- Deleted rules cannot be recovered
- The system supports both IPv4 addresses
- IP ranges are inclusive (both Start IP and End IP are included)
- Empty expiration date means the rule never expires
- Expired rules are not automatically deleted but become inactive
Documentation created: February 11, 2026 Environment: Exigo Admin v2025.5.7.8